Tag: pittsburgh recipes

Garlic Herb Roasted Chicken Quarters

Chicken quarters are inexpensive, juicy cuts of deliciousness. Consisting of a leg and a thigh, they have skin that can be pan seared, or taken off to make them healthier.

Seasoning with a garlicky, salty dry rub on top of a very thin layer of garlic oil adds a finish to the chicken. Spice it up by adding some cayenne pepper or sweeten them up with some brown sugar or cinnamon.

IMG_6784

Here is the recipe…

Garlic Herb Roasted Chicken Quarters

Ingredients:

4 cloves garlic, finely chopped
1 tsp. dried oregano
1 tbsp. chili powder
1/2 tbsp. ground cumin
2 tbsp. garlic olive oil-
Salt/pepper
4 chicken leg quarters
1/2 cup chicken broth
1/4 cup white wine

Directions:
Preheat oven to 375 degrees.
Lightly oil a baking sheet.
Cut off excess fat and trim chicken Quarters.
Rinse and pat dry.
In a small bowl combine garlic, oregano, chili powder, cumin, salt and pepper.
Brush each chicken with a light layer of garlic olive oil.
Coat with herb and spice mix.
Before adding chicken to the baking sheet, add chicken broth and white wine to 1/4 inch.
Place chicken Quarters on a baking sheet.
Roasted in oven 25 minutes or until juices run clear.

Serve with your favorite side dishes!

IMG_6783

Enjoy!
Ciao!

Chestnut & Parmigiano Reggiano Stuffing!

With two turkeys stuffed and an extra pan for the vegetarians, I always have a ton of leftover stuffing!

img_5230

We eat some on the “leftover plate” or sandwich, but never really turn it into another meal. Lately, my eyes have been opened to the wonderful world of fresh chestnuts.  I was in an old Italian section of Pittsburgh, Bloomfield, and there was a chestnut stand on the sidewalk. I bought some and thought I would experiment.

Of course adding cheese and chestnuts, changes the flavor of traditional stuffing completely. Add turkey, chicken, or sausage and turn the dish into a hearty meal!  Here is the recipe…

img_5228

img_5234

Chestnut Stuffing
Ingredients:
2 cups chestnuts
2 loaves white bread, cubed
1 stick butter
1 onion, chopped
3 stalks celery, chopped
4 cloves garlic, finely chopped
salt/pepper
1/2 cup chicken broth
1/2 cup Parmigiano Reggiano, fresh grated
1 cup pulled turkey

Directions:
Preheat oven to 350 degrees.
Cut an “X” shape on the chestnuts with a sharp knife.
Place into a saucepan and cover with cold water.
Bring to a boil, then lower the temperature and simmer for 30 minutes, or until tender
Drain and let the chestnuts cool.
Peel skin and chop the inside.
In a large pan, melt butter and add onion, celery, garlic, salt and pepper.
Add sage and chestnuts and stir.
Mix 1/2 cup of mixture with 2 cups of cubed bread in a large mixing bowl until incorporated.
Add chicken broth as needed until just moist.
Stir in pulled turkey and Parmigiano Reggiano.
Transfer to a casserole dish and bake 40 minutes.

img_5232

img_5237

Enjoy!
Ciao!


I am happy to be representing Parmigiano Reggiano for Parma, Italy as their US Ambasador.  Remember, Parmiginao Reggiano is the only parmesan = )

Garlic Ricotta and Roasted Brussels Sprouts Pizza!

This is cooking stripped down to the bare bones. No need for fancy herbs, spices, or ingredients. The best brussels sprouts are tossed with olive oil salt and pepper and roasted until crisp on the edges.

img_4598


img_4596

My Brady ,7-years-old, will not eat brussels sprouts even if they are “candied”. My mommy description that should win the war. Technically? Yes, they caramelize, thus that makes them candied. So I was making him a pizza and ended up making a second with ricotta and Brussels sprouts! This combination is delicious!

Here is the recipe…

img_4594

Garlic Ricotta and Roasted Brussels Sprouts Pizza

Ingredients:
2 cups brussels sprouts
2 tbsp. olive oil
Salt/pepper
1/3 lb.thick pancetta, cut into small cubes

For the ricotta base mix,
2 cups fresh ricotta cheese
3 cloves garlic, finely chopped
salt/pepper

Your favorite prepared pizza dough or shell.
Parmigiano Reggiano for topping. (I used 14 month aged)

Directions:
Preheat oven 400 degrees.
Clean and slice brussels sprouts in half.
Toss with olive oil, salt and pepper.
Roast until browned to desired likeness and remove from pan.
Meanwhile, cook pancetta bits in a pan until crispy.
Add the pancetta to the brussels and mix well.
Cover the pizza shell with ricotta mixture.
Add brussels sprouts/pancetta layer.
Top with fresh grated Parmigiano Reggiano cheese.

img_4586

img_4599

img_4597

Enjoy!
Ciao!

Always make sure you are buying Parmigiano Reggiano from Parma Italy, the only Parmesan. Parmesan Princess is happy to represent Parmigiano Reggiano as their US ambassador.

In this recipe I used 14 month aged Parmigiano Reggiano. It is younger and creamier, a perfect finish to this amazing dish.

Cilantro Lime Shrimp with Chili Garlic Dip !

Sometimes the naming game is half the battle. Take this dish for example. Cilantro Lime Shrimp with Chili Garlic Dip was the final decision, but really the shrimp are chili, too. How much of the ingredients of a dish should be in the title? Is it going to be a surprise that I also roasted corn off of the cob and served it all over rice? With over two years of blogging recipes, there is still so much more to learn!


img_3707

Shrimp have been on my brain all week! I wanted to do shrimp tacos for taco tuesday, but the kids wanted “meat” tacos so we did steak. And today, as the ruler of my castle, decided to tell my kids they are eating what I make. I should mention now they ate it all… and seconds. #Winning!

img_3712

I love to do a citrus flavor and it always ends up with a cumin, chili powder, garlic salt blast on something. You know, because logically those three ingredients totally complement lime. Just something I’ve picked up with my obsession with these spices.


img_3705

img_3706


It is easy to overcook the shrimp in this dish because they are coated. Look for the pink and meat to turn white instead of translucent. There is nothing worse than a succulent shrimp dish that lost all of its succulency….Well, you know what I mean.

img_3684 img_3711

Can we talk about this dip? Chili Garlic Dip from Oil & Vinegar is actually the finest form of a Thai Chili Sauce I have ever had! Try it, Buy it, it is amazing. Last night I made bacon wrapped chicken and we also dressed those with this delicious sauce. The cooking TV show I co-host Between The Eats partners with Oil & Vinegar, check out some other fun products we have used in fabulous dishes!

Here it is…

Cilantro Lime Shrimp with Garlic Chili Sauce
(Feeds4-6)

Ingredients:
2 lbs. unpeeled, raw shrimp
6 cups of your favorite rice, prepared or uncooked
3 ears corn on the cob, cut off the cob
2 tbsp. chili powder
1-1/2 tsp. ground cumin
1 tsp. garlic salt
black pepper
2 limes
1 small bunch cilantro, chopped
3 tbsp. olive oil
1 Jar Chili Garlic Dip, or your favorite spicy dipping sauce

Directions:

Peel shrimp, leaving tails intact.
In a small mixing bowl, blend chili powder, cumin, garlic salt, and pepper together.
Place shrimp in a large bowl and coat with spice mixture.
Begin cooking rice according to package.
Heat olive oil in a large pan.
Add 1/2 shrimp, be sure not to overcrowd or overlap. I did 2 batches.
Squeeze 1/2 lime over shrimp.
Cook 3-4 minutes and flip for 2-3 minutes, or until shrimp are pink and start to curl up.
Remove from heat and add second batch. Squeeze other 1/2 lime. Repeat cook. Place shrimp on a plate.
Meanwhile, add corn to the pan with all of the seasoning drippings and goodness in the bottom of the pan.
Roast until slightly browned and softened. Try one, should have a pop but be tender.
Remove corn from the pan and place into a bowl.
Add rice to pan, top with shrimp, 3/4 chopped cilantro and 1/2 lime juice.
Serve with corn and a scoop of chili garlic dip!

img_3709 img_3710

Enjoy!
Ciao!

The Best Ever Mexican Lasagna!

Truth. I have tried many different “Mexican Lasagnas” throughout the years. Mostly using leftovers. They ended up being a delicious undressed taco with layers, but honestly never blew my socks off!

image

image

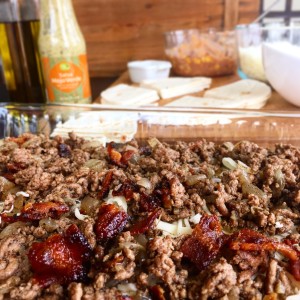
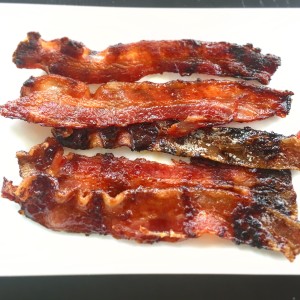
So this time I had an idea. Why not add some yummy Brown Sugar Sriracha Glazed Bacon and see what happens. What happened was like the best thing ever! So instead of a very good cumin, chili powder seasoned garlic onion ground beef layer-kind of boring- we have crunchy bites of sweet and spicy glazed bacon throughout the meat later! Yikes! So good!

image

image

Like most lasagnas, the leftovers the next night were even better!

Here is the recipe…

image

Mexican Lasagna
Makes one 9X13 lasagna

Ingredients:
2 tbsp. olive oil for meat and 2 tbsp. for casserole dish
1 lb. ground beef
1/2 lb. Brown Sugar Sriracha Glazed Bacon (see recipe below)
3 cloves garlic, chopped
1 small onion, chopped
1 tbsp. cumin
2 tbsp. chili powder
red pepper flakes- for added heat
salt/pepper to taste
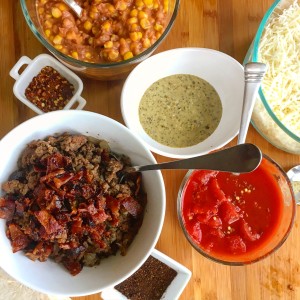
1 15 oz. can refried beans
1 cup corn kernels, frozen and steamed, canned, or fresh cut off the cob
1 cup Salsa Mojo Verde /your favorite taco sauce
1 14 oz. can stewed tomatoes
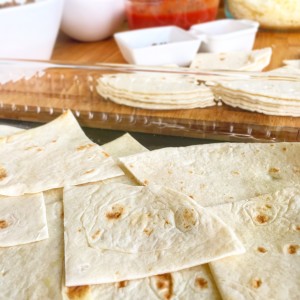
10 flour tortillas
2 cups shredded chihuahua cheese
1 cup shredded mozzarella cheese
cilantro, garnish

For the Brown Sugar Sriracha Glazed Bacon
Ingredients:
1/2 lb. thick sliced bacon
1/2 cup dark brown sugar
2 tbsp. sriracha sauce

Directions:
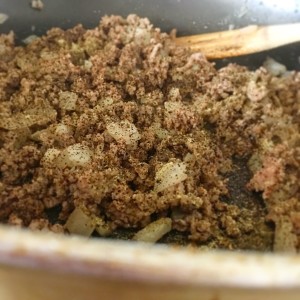
Heat olive oil in a medium pan.

Toss onions and garlic with oil and cook for 3 minutes.

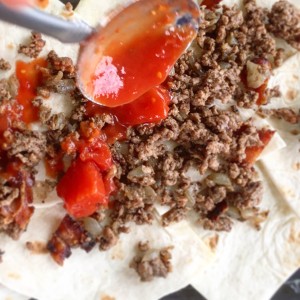
Add ground beef and cook until no longer pink, drain any excess fat.

Place meat in a mixing bowl.

image

Meanwhile, to cook the Brown Sugar Sriracha Glazed Bacon…
Preheat oven 350 degrees.

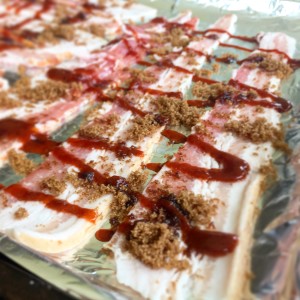
Place bacon strips in a single layer on an aluminum foil covered cookie sheet.

Sprinkle dark brown sugar.

In a top to bottom motion, squeeze a small stream of Sriracha sauce in zig zags.

Bake 13-18 mins. until glazed and crispy. (Remember, the sugars on the bacon will “crisp up” as they cool. Don’t think it will be crunchy when you remove it from the oven. I know it’s hard to wait, but don’t burn your mouth it will be very hot!!)

image

image

image

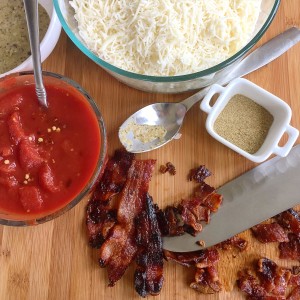
When cool, chop bacon into 1/4 inch pieces and mix into ground beef bowl.

Combine refried beans and corn in a separate bowl.

Combine stewed tomatoes, salt/pepper, and red pepper flakes in a bowl.

Combine cheese in a bowl.

Cut tortilla shells, 2 cuts into triangles.

image


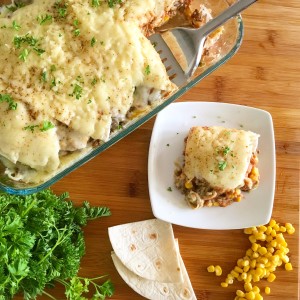
Layer lasgna-starting by coating casserole dish with olive oil, then covering by overlapping tortillas until covered.

Next, add a cheese layer, meat, tomatoes, beans and corn, salsa mojo verde or taco sauce, followed by another layer of tortilla shells.

image

End with tortillas and cheese on top.

Bake 15-25 minutes until cheese is melted and bubbly.

Sprinkle with chopped cilantro.

Enjoy!
Ciao!

Lemon Herb Garlic Shrimp!

Everytime I prepare this shrimp dish I have people begging me for the recipe and I feel so guilty because it is so easy!

image

The lemon herb garlic shrimp skewers are perfect for a summer night when served with a cold salad, or don’t skewer the shrimp and toss them with your favorite long pasta like angel hair.

image

The technique in the recipe is the fastest – coating the shrimp with olive oil, rolling in herbs, grilling shrimp, and squeezing lemon. If there is time, the herbs can be infused in the garlic before covering the shrimp. This creates a stronger herb flavor. Either are delicious, it just depends how much time you have!

image

Lemon Herb Garlic Shrimp!

Ingredients:
1 lb. medium shrimp, cleaned and deveined
1 lemon, sliced into wedges
3 cloves garlic, finely chopped
2 thyme springs, leaves removed and finely chopped
1 tbsp. Basil, finely chopped
1 tbsp. Rosemary, finely chopped
(Cayenne pepper optional to add heat)
Salt/Pepper to taste
Wood skewers

image

image

Directions:
In a small bowl mix herbs and garlic and cover a plate.
Skewer shrimp.
Drizzle with olive oil and either brush or use clean fingers to coat.
Dip into herbs on a plate.
Set skewers on a parchment covered cookie sheet or prepare to grill.
Grill a few minutes per side until shrimp turn pink.
Broil in oven until shrimp turn pink, turning once.
Squeeze half of a lemon over cooked skewers and serve!

image

image

Enjoy!
Ciao!

Sausage Gnocchi With Arugula!

Potato pillows that melt in your mouth, homemade Italian deliciousness…yep, gnocchi.  Instead of a traditional tomato sauce, I love to try new flavor combinations with gnocchi because they are a blank slate!  There are plenty of delicious fresh gnocchi, or frozen fresh options if you don’t make your own. I like to freeze my gnocchi, ravioli, and cavatelli, for a rainy day.  It is my opinion that these types of homemade pasta cook better from frozen.  This meal took under 20 minutes!  Win!
image
I received the most perfect pork sausage from the meat CSA at Big Horn Ranch and tossed it with the gnocchi, spicy oregano, red pepper flakes, and the crunch bite of arugula. Dressed with olive oil, a little goes a long way, coating each bite.  The sausage had very little fat, but sorry fat haters, fat is flavor. A reasonable amount is fine! The kids loooooved this recipe and had seconds and thirds.  I happened to have arugula handy, feel free to sub kale or spinach!


image
Sausage Gnocchi With Arugula

Ingredients:
1 lb. pork sausage, Italian sausage out of casing
1 lb. potato gnocchi, homemade or frozen
2 tbsp. garlic olive oil
4 cloves garlic, finely chopped
salt/pepper to taste
2 tbsp. crushed red pepper
1 tbsp. oregano
fresh gated parmesan cheese
Directions:
Cook sausage and garlic in a large pan while chopping and crumbling with a spoon, until browned.
Drain fat. (I was lucky and had no more than 1/2 tsp. of fat so I left it in for flavor.
Meanwhile, boil a pot of water add salt and cook gnocchi until they float.
Drain, save 2 tbsp. pasta water.
Add olive oil, sausage, and arugula to the large pan and toss to coat.
Salt/pepper to taste.
Sprinkle with oregano and crushed red pepper.
Top with fresh grated parmesan cheese.
image
image
image
Enjoy!
Ciao!

Corn & Chicken Chowder!

Most of the time my menus are planned around the weather. Chilly, rainy Spring days call for a warm and comforting dinner.

image

The days activities determine the intricacy and time commitment of the prep. There is nothing wrong with taking a few shortcuts, like buying a rotisserie chicken, for example. Hey, we are cooking at home, the number one step towards a healthier lifestyle. It is possible to cook delicious meals for the family. It is impossible to add time to our day.

image

Sweet corn has just started popping up in my local grocery stores- really early I know, but I have ben totally in the mood, especially after the 78 degree summer teaser days we have had recently. Many of my favorite dishes require fresh frozen or sweet corn cut off the cob. I am a huge salty sweet fan, so anytime corn is roasted with garlic, butter, and salty spices, I cannot get enough. My latest find is a dry sriracha seasoning. I’ve been sprinkling it on everything!

image

A corn chowder is a perfect example of this mix of flavors. Comforting, with just enough kick to be different, this recipe is a family favorite and my kid’s eat seconds!
Here is the recipe…

image

Corn & Chicken Chowder
Ingredients:
2 tbsp. butter
1 small onion, chopped
3 cloves garlic, finely chopped
2 tbsp. flour
1-1/2 lbs. chicken breast, roasted (or rotisserie chicken breast shredded)
6 cups chicken stock
1 cup heavy cream
2 – 10 oz. bag frozen corn or 6 ears of corn cut off the cob
1 14 oz. can cream style corn
salt/pepper to taste
chopped green onions /parsley for garnish
Optional- 3 tbsp. sriracha, dried sriracha, cayenne pepper to taste

Directions:

Melt butter in a soup pot.
Add onions and cook until softened.
Add garlic and cook for another 30 seconds.
Stir in flour until thickens.
Whisk in chicken stock bring to a boil and simmer 15-20 minutes.
Add chicken and corn and cook low to medium heat 10 minutes.
Ladle into bowls and top with garnish.

image

image
Enjoy!
Ciao!

Pulled Chicken Sloppy Joes!

Definitely not the lunch lady’s sloppy joes…
These pulled chicken sloppy joes are made with chicken breast instead of red meat. A healthy alternative to the traditional ground meat sloppy joe, the sugar can be adjusted for sweetness or you can even try a little honey instead!
Here is the recipe…
image

Pulled Chicken Sloppy Joes
(Makes 6 sandwiches)

Ingredients:
3 chicken breasts, salt/peppered baked until internal temperature 165 and pulled
1/4 cup dark brown sugar
2 tbsp. Worcestershire sauce
2 tbsp. tomato paste
3 cloves garlic, chopped
1 small onion, chopped
1 small bell pepper, chopped
1 32oz. can San Marzano tomatoes
1 tsp. cayenne pepper
salt/pepper to taste
4 -6 rolls, sliced, toasted, and buttered

Directions:
Whisk together worcestershire sauce, tomato paste, and brown sugar.
Add garlic, onion, bell pepper to a large pan and cook 5 minutes.
Add chicken and tomatoes, cayenne pepper, salt and pepper.
Reduce heat, simmer until sauce thickens.
Spoon onto rolls and serve.

image

image

Enjoy!
Ciao!

Double Chocolate Cherry Chunk Cookies

My holiday baking typically includes tons of nuts! I am not sure if it’s because I grew up with old school Italian recipes where heaps of nuts and/or raisins were added to every single simple cookie or because I loooove the taste and texture. Not a huge raisin fan, I tend to add dried cranberries or cherries instead.
These double chocolate chunk cookies are a holiday favorite cookie- a must try! I doctored them up with some dried cherries and walnuts! Get creative and add in your faves!

image

image

Double Chocolate Cherry Chunk Cookies
(Makes 3 dozen 2 inch cookies)
Ingredients:
2 cups flour
1 tsp. baking soda
1/2 cup cocoa
1 cup butter, softened
1-1/2 tsp. vanilla extract
1 cup sugar
1 cup light brown sugar
2 eggs
1 11.5 oz package chocolate chunks
3/4 cup dried cherries, chopped (optional)
3/4 cup walnuts, chopped (optional)

Directions:
Preheat oven to 350 degrees.

In a large mixing bowl combine flour, baking soda, and cocoa.

Cream butter, sugar, brown sugar, and vanilla until light and fluffy.

Add eggs one at a time, beating well.

Beat in dry mixture a little at a time until well mixed.

Stir in chocolate chunks, chopped dried cherries, and chopped walnuts.

Drop by tsp. onto a parchment lined cookie sheet. 2 inches apart.

Bake 9-11 minutes until set.

Remove and let cool on sheet for 3 minutes then move to a wire rack to complete.

image

Enjoy!
Ciao!