White Clam Pizza!

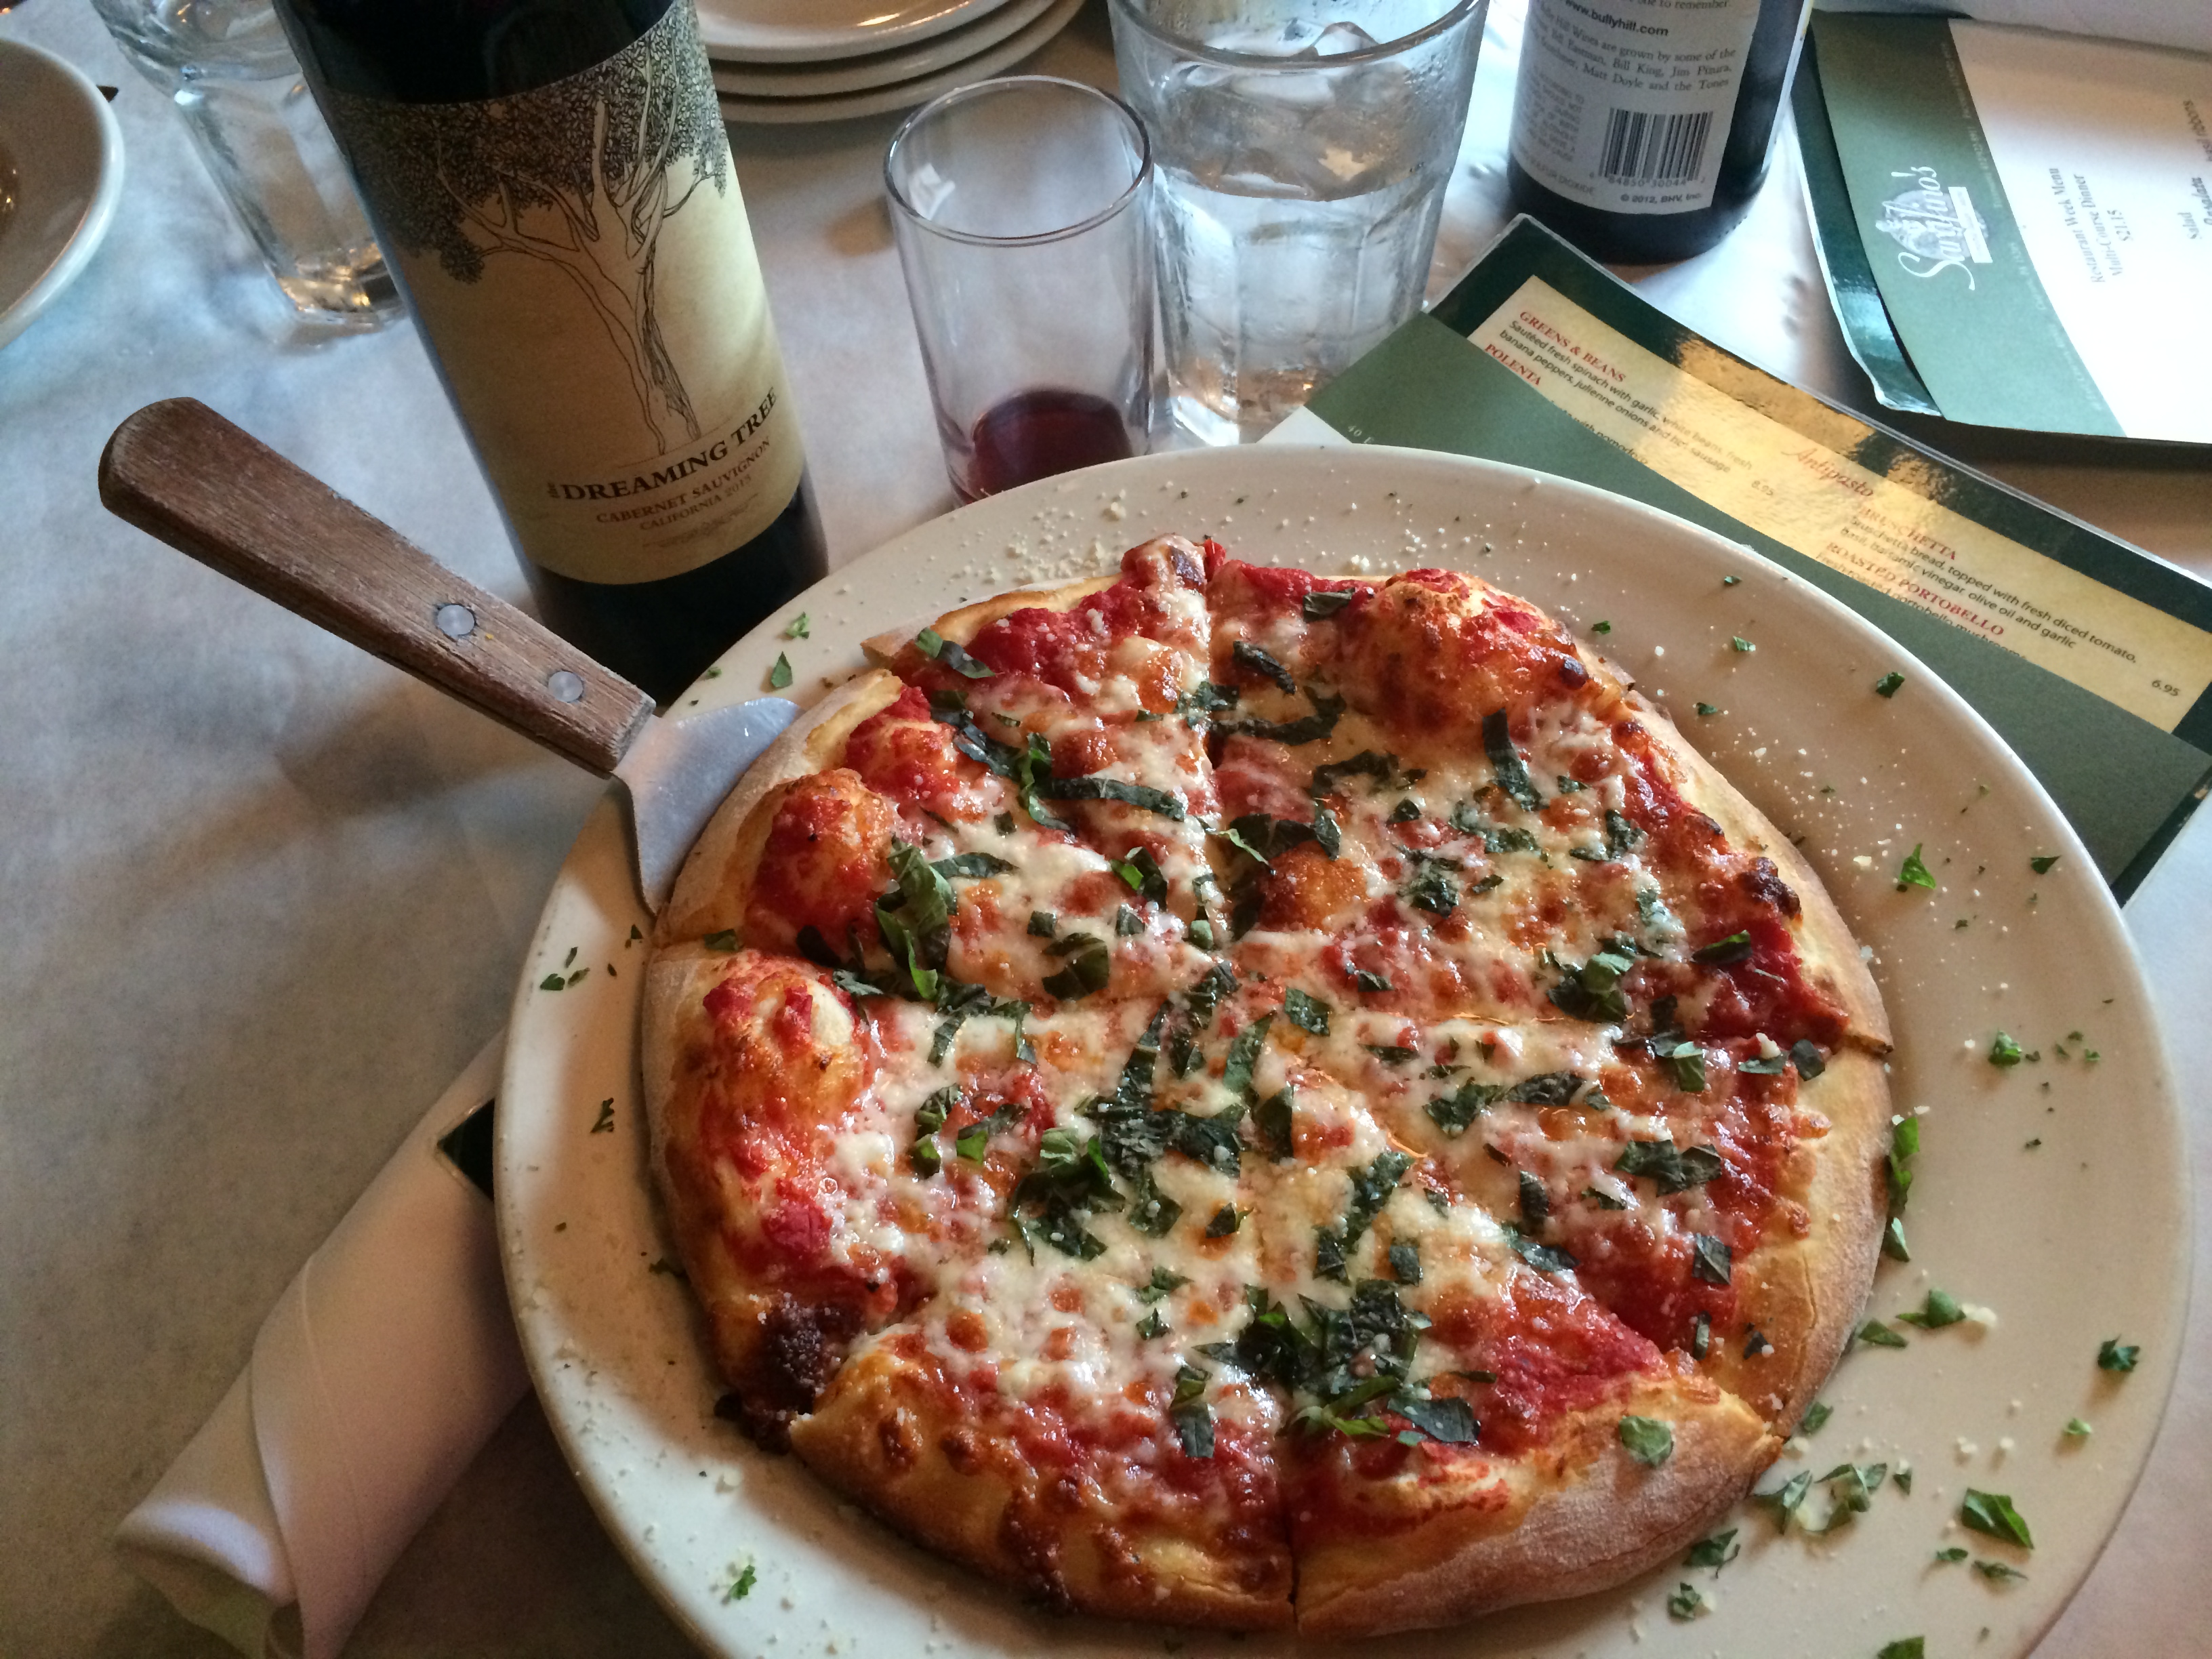
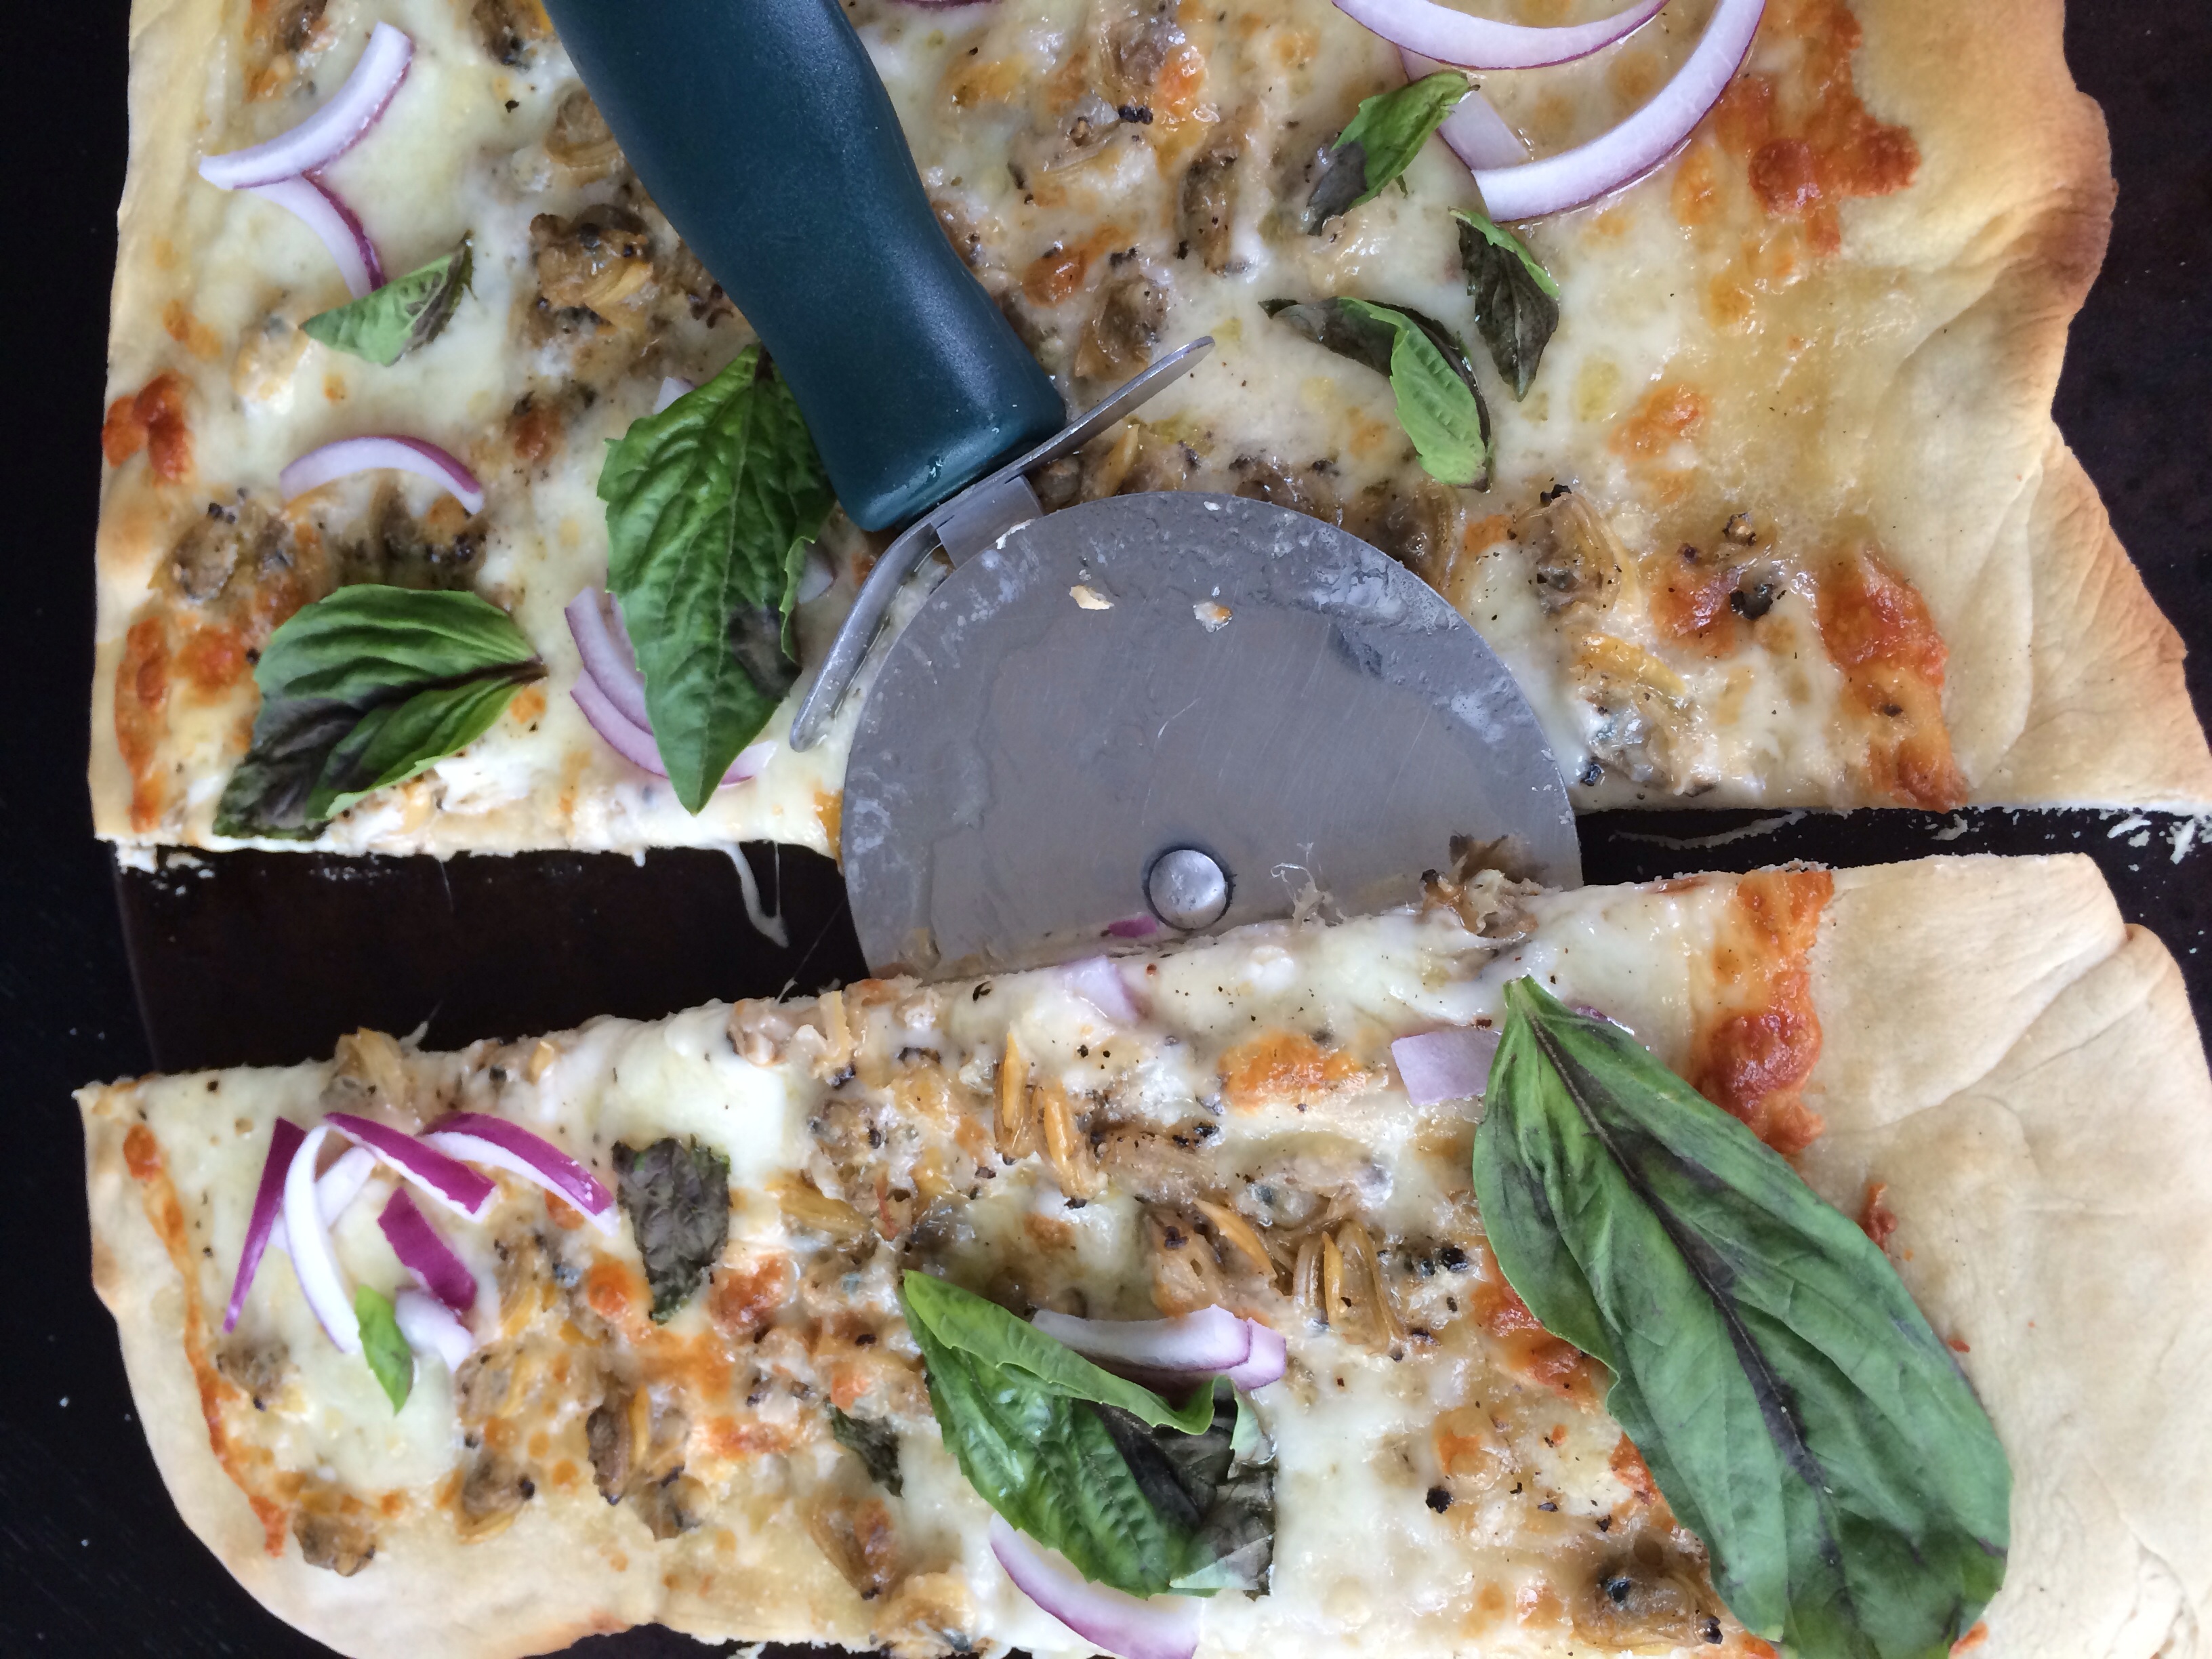
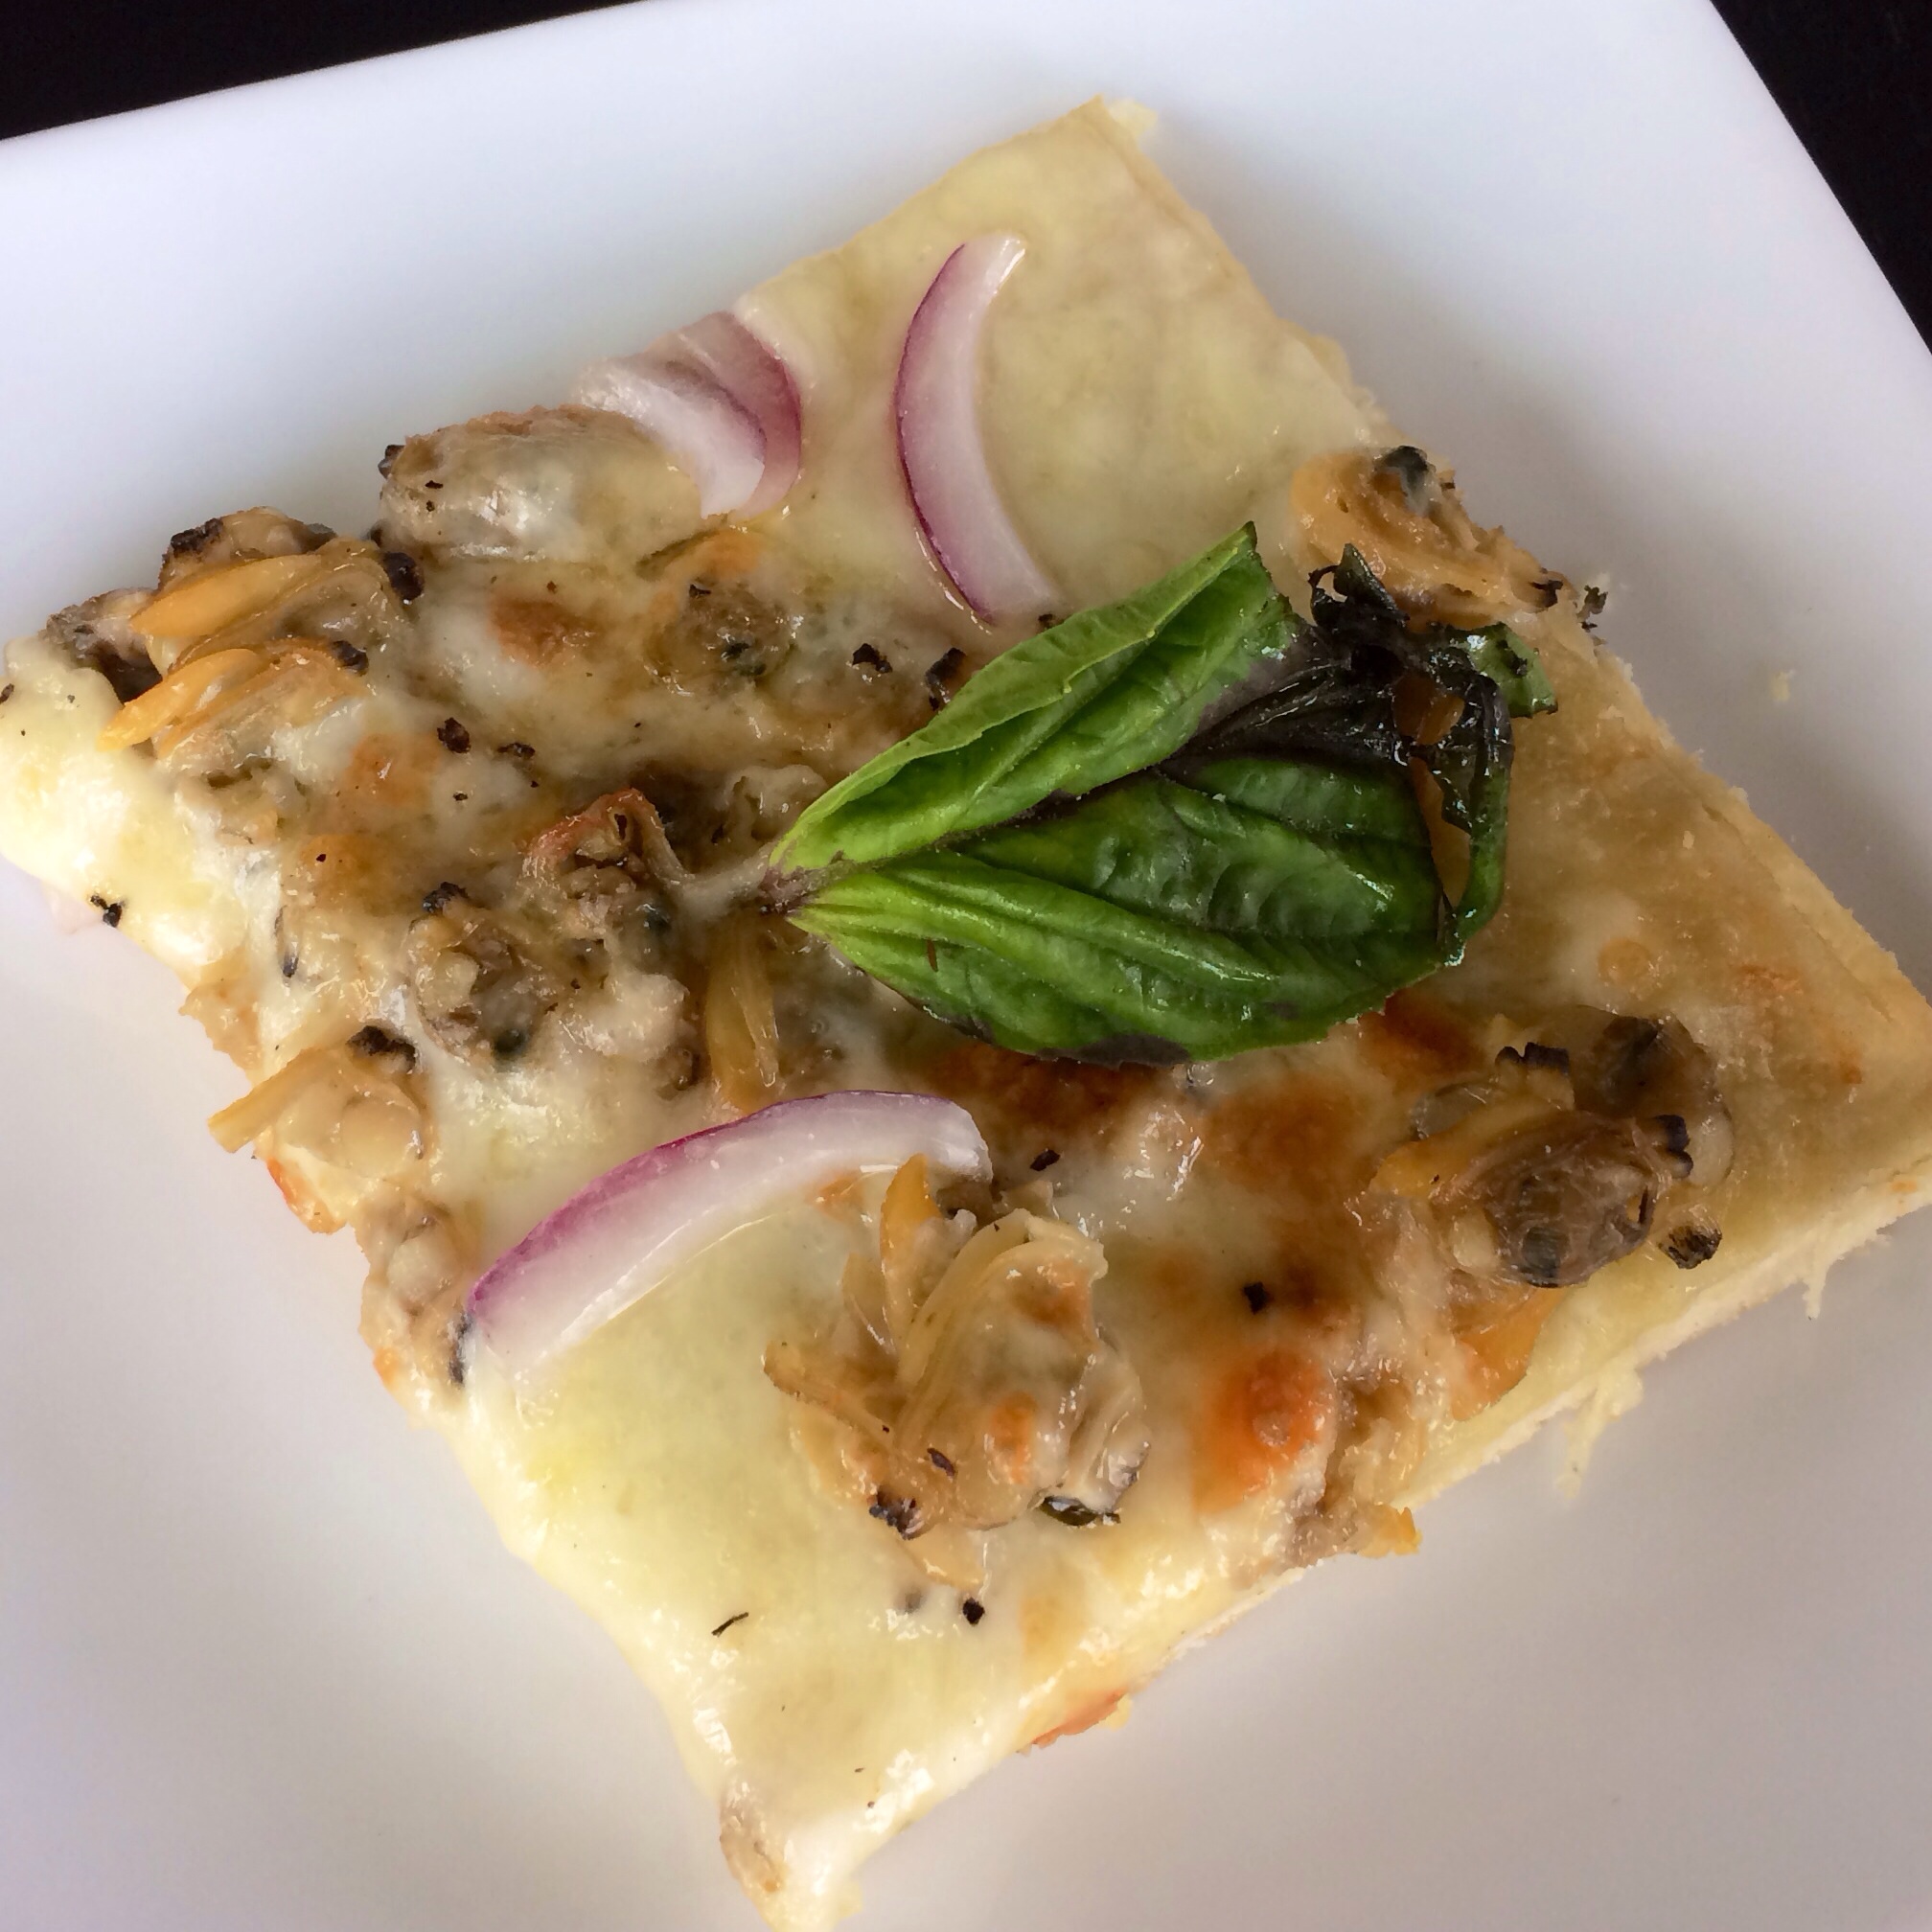
Linguini clams is probably my all time favorite dish besides seafood pasta, which is pretty much the same thing. I think because it has a light “sauce,” just a splash of garlic olive oil, white wine, lemon spritzed yum on each bite. Sooooo good- there is seriously something addicting about it! I was thinking, what if I put these heavenly bites on a crispy pizza crust? And so my white clam pizza was born…topped with fresh mozzarella, red onion, and fresh basil.

image

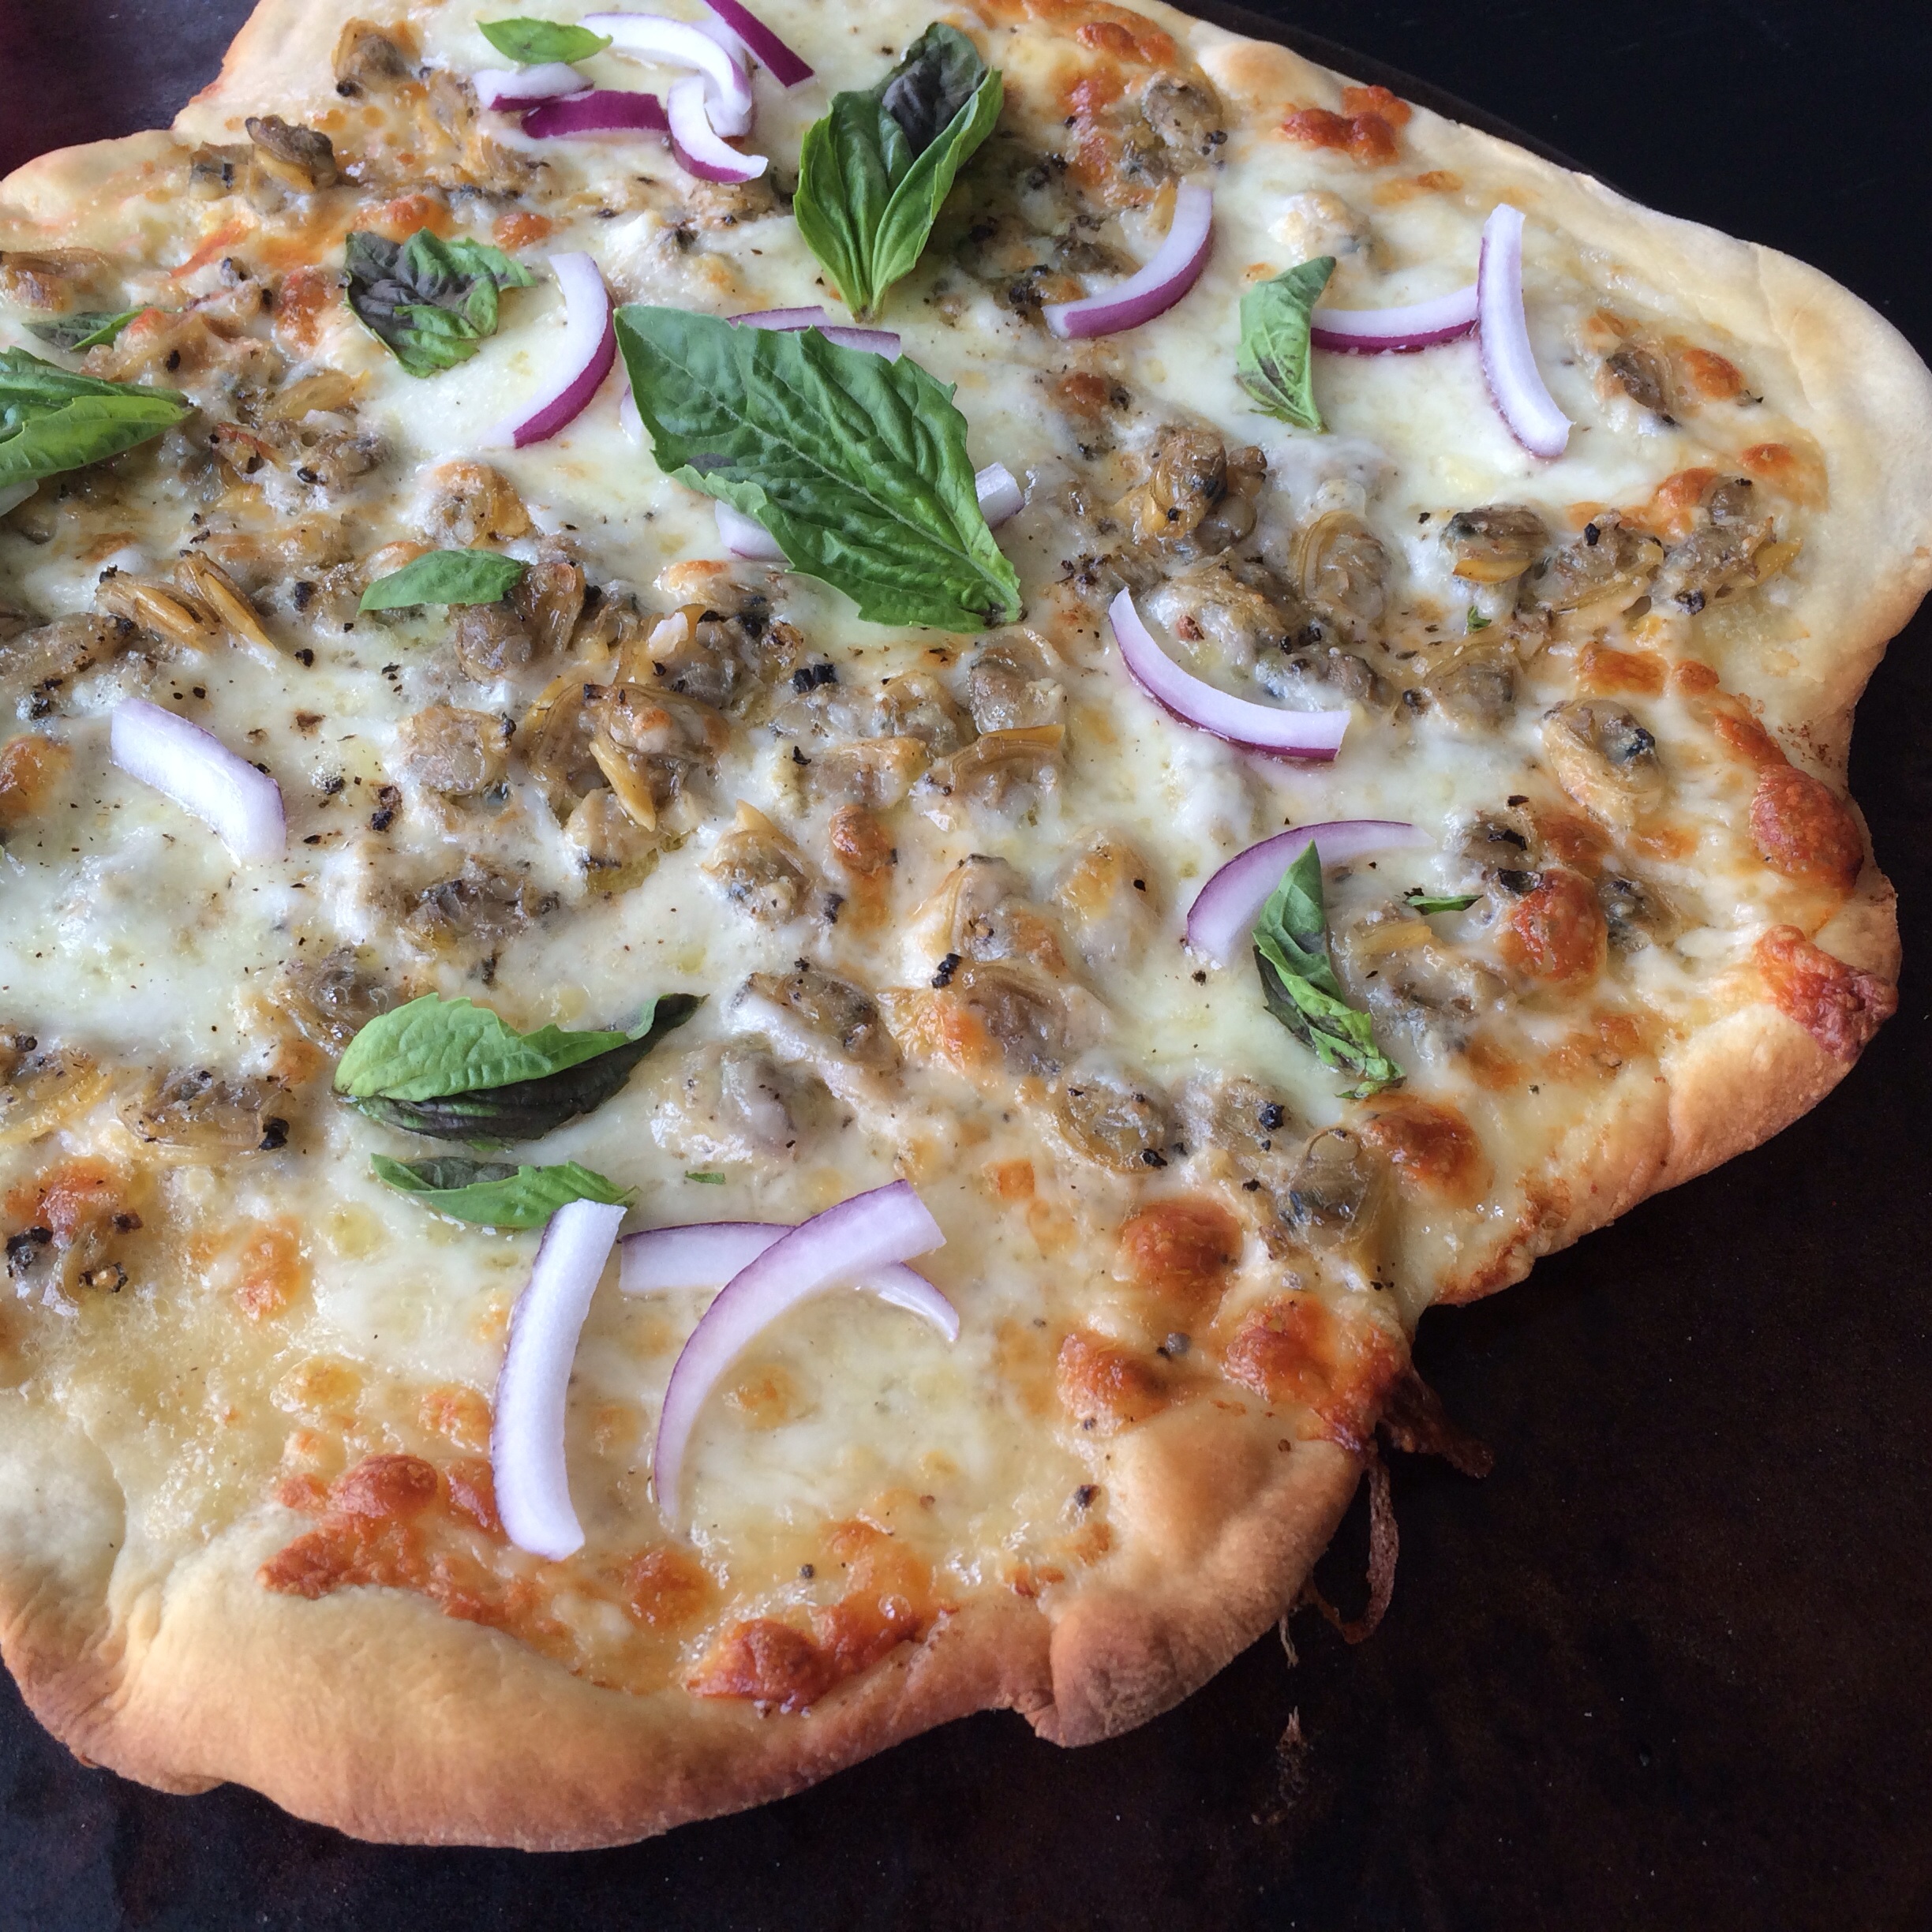
Yep! As classy as a fancy appetizer or as “game day” as a buffalo chicken dip, you can take this pizza anywhere!

image

The no yeast easy pizza dough recipe is one to keep forever. One time I was out of yeast packets and added some baking soda to my pasta dough recipe, totally worked! It’s a thin crust. You can add herbs for flavor or leave it plain! Experiment, try different things, and let me know what works!

White Clam Pizza

Ingredients:
3 tbsp. olive oil
4 cloves garlic, finely chopped
1/2 lb. clam meat (I use PanaPesca clam meat in juice)
2 tbsp.lemon juice
1/4 cup white wine
salt/pepper
1/2 cup shredded provolone/mozzarella
6-8 slices fresh mozzarella
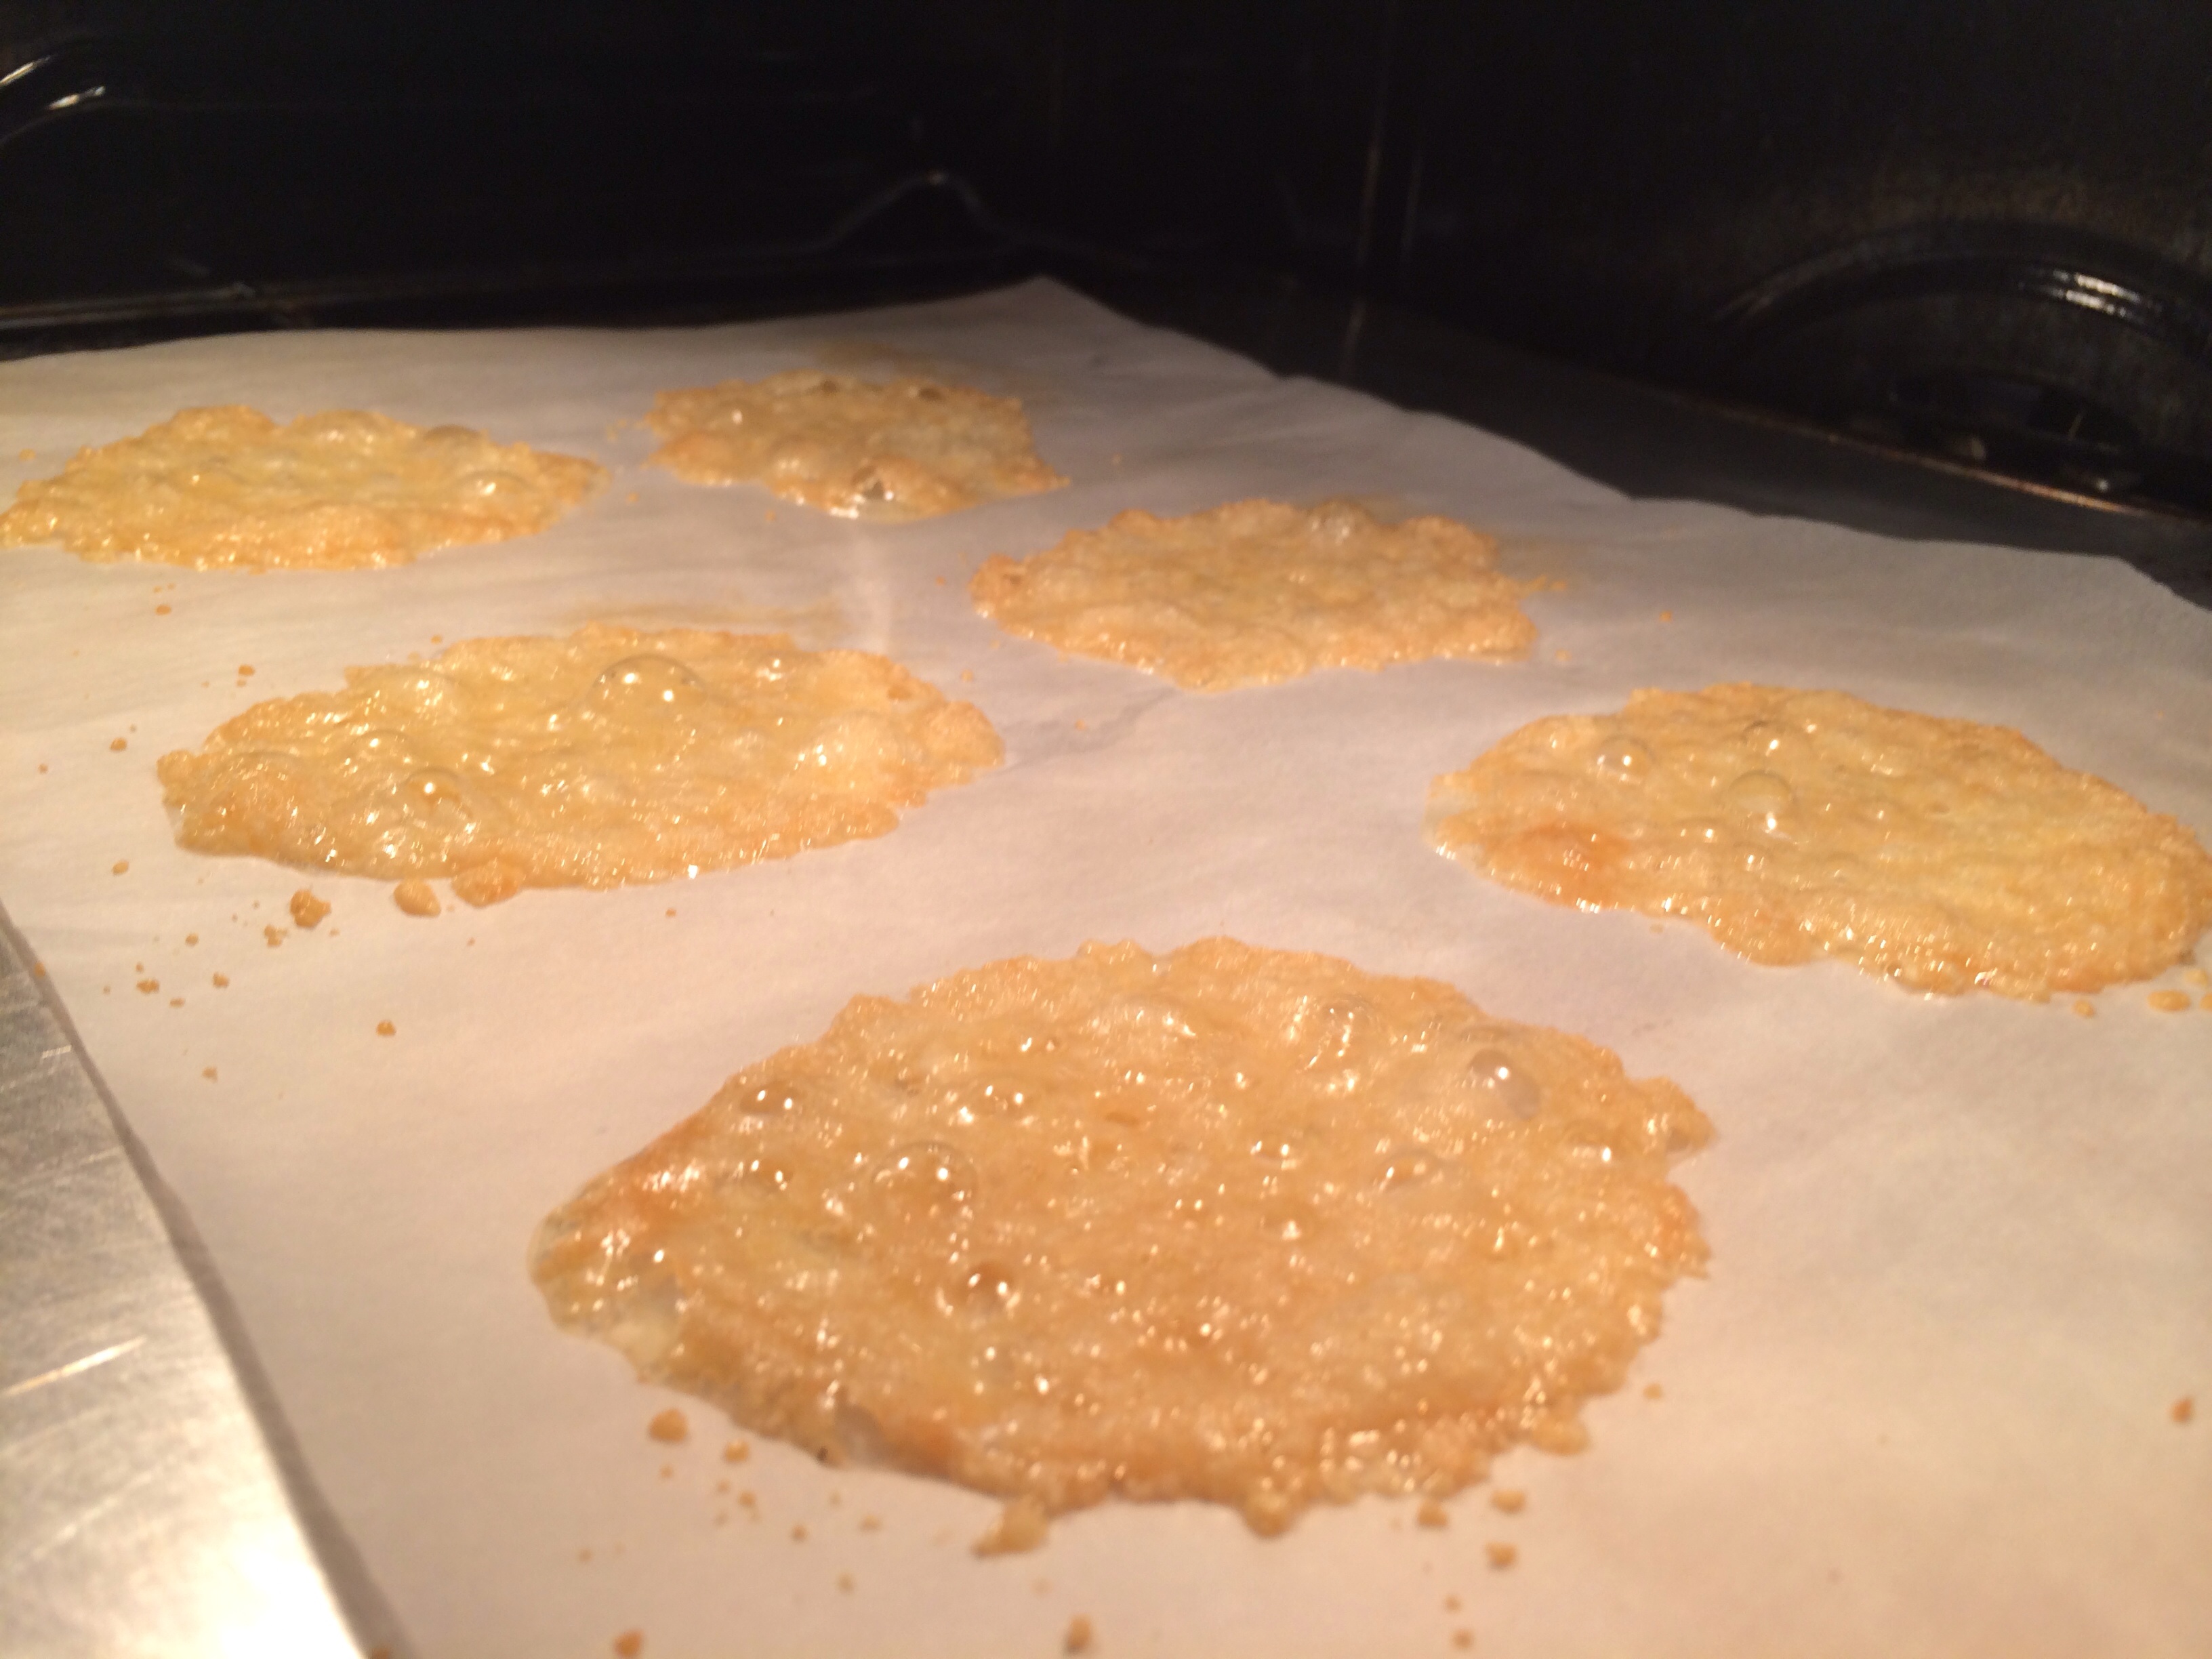
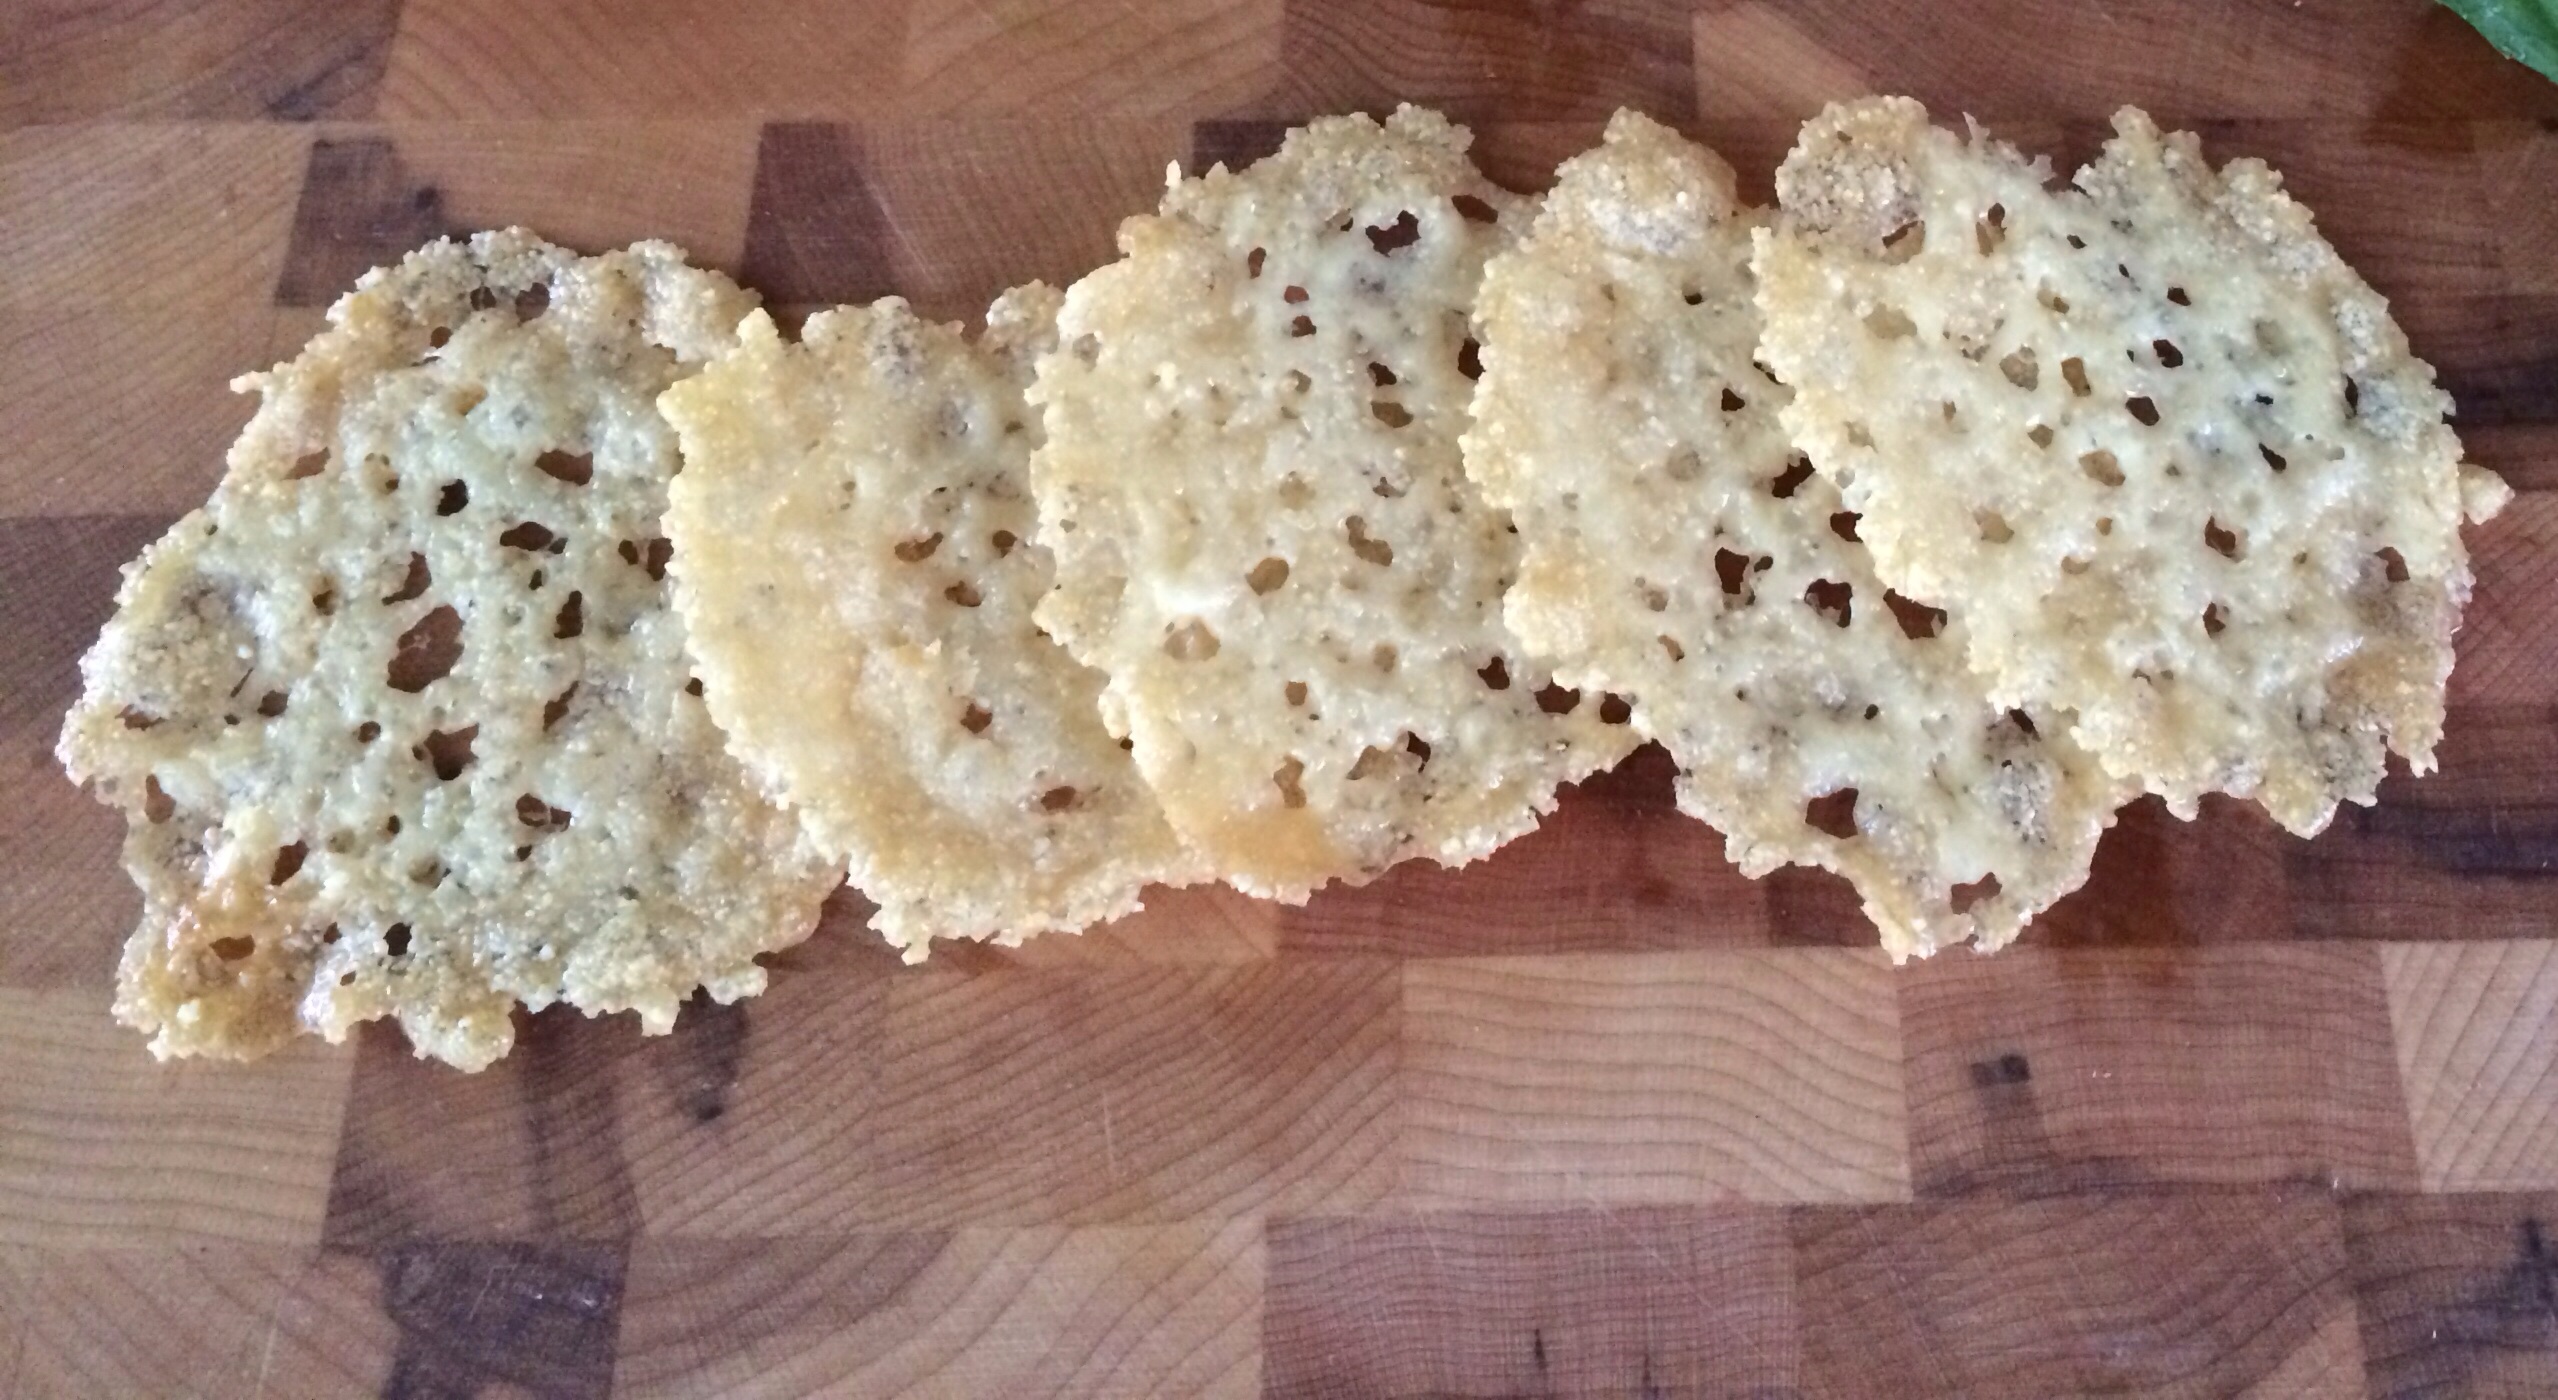
2 tbsp. fresh grated parmesan cheese
1/2 red onion, frenched, then cut in half if too big -depends on the size of your onion 😉
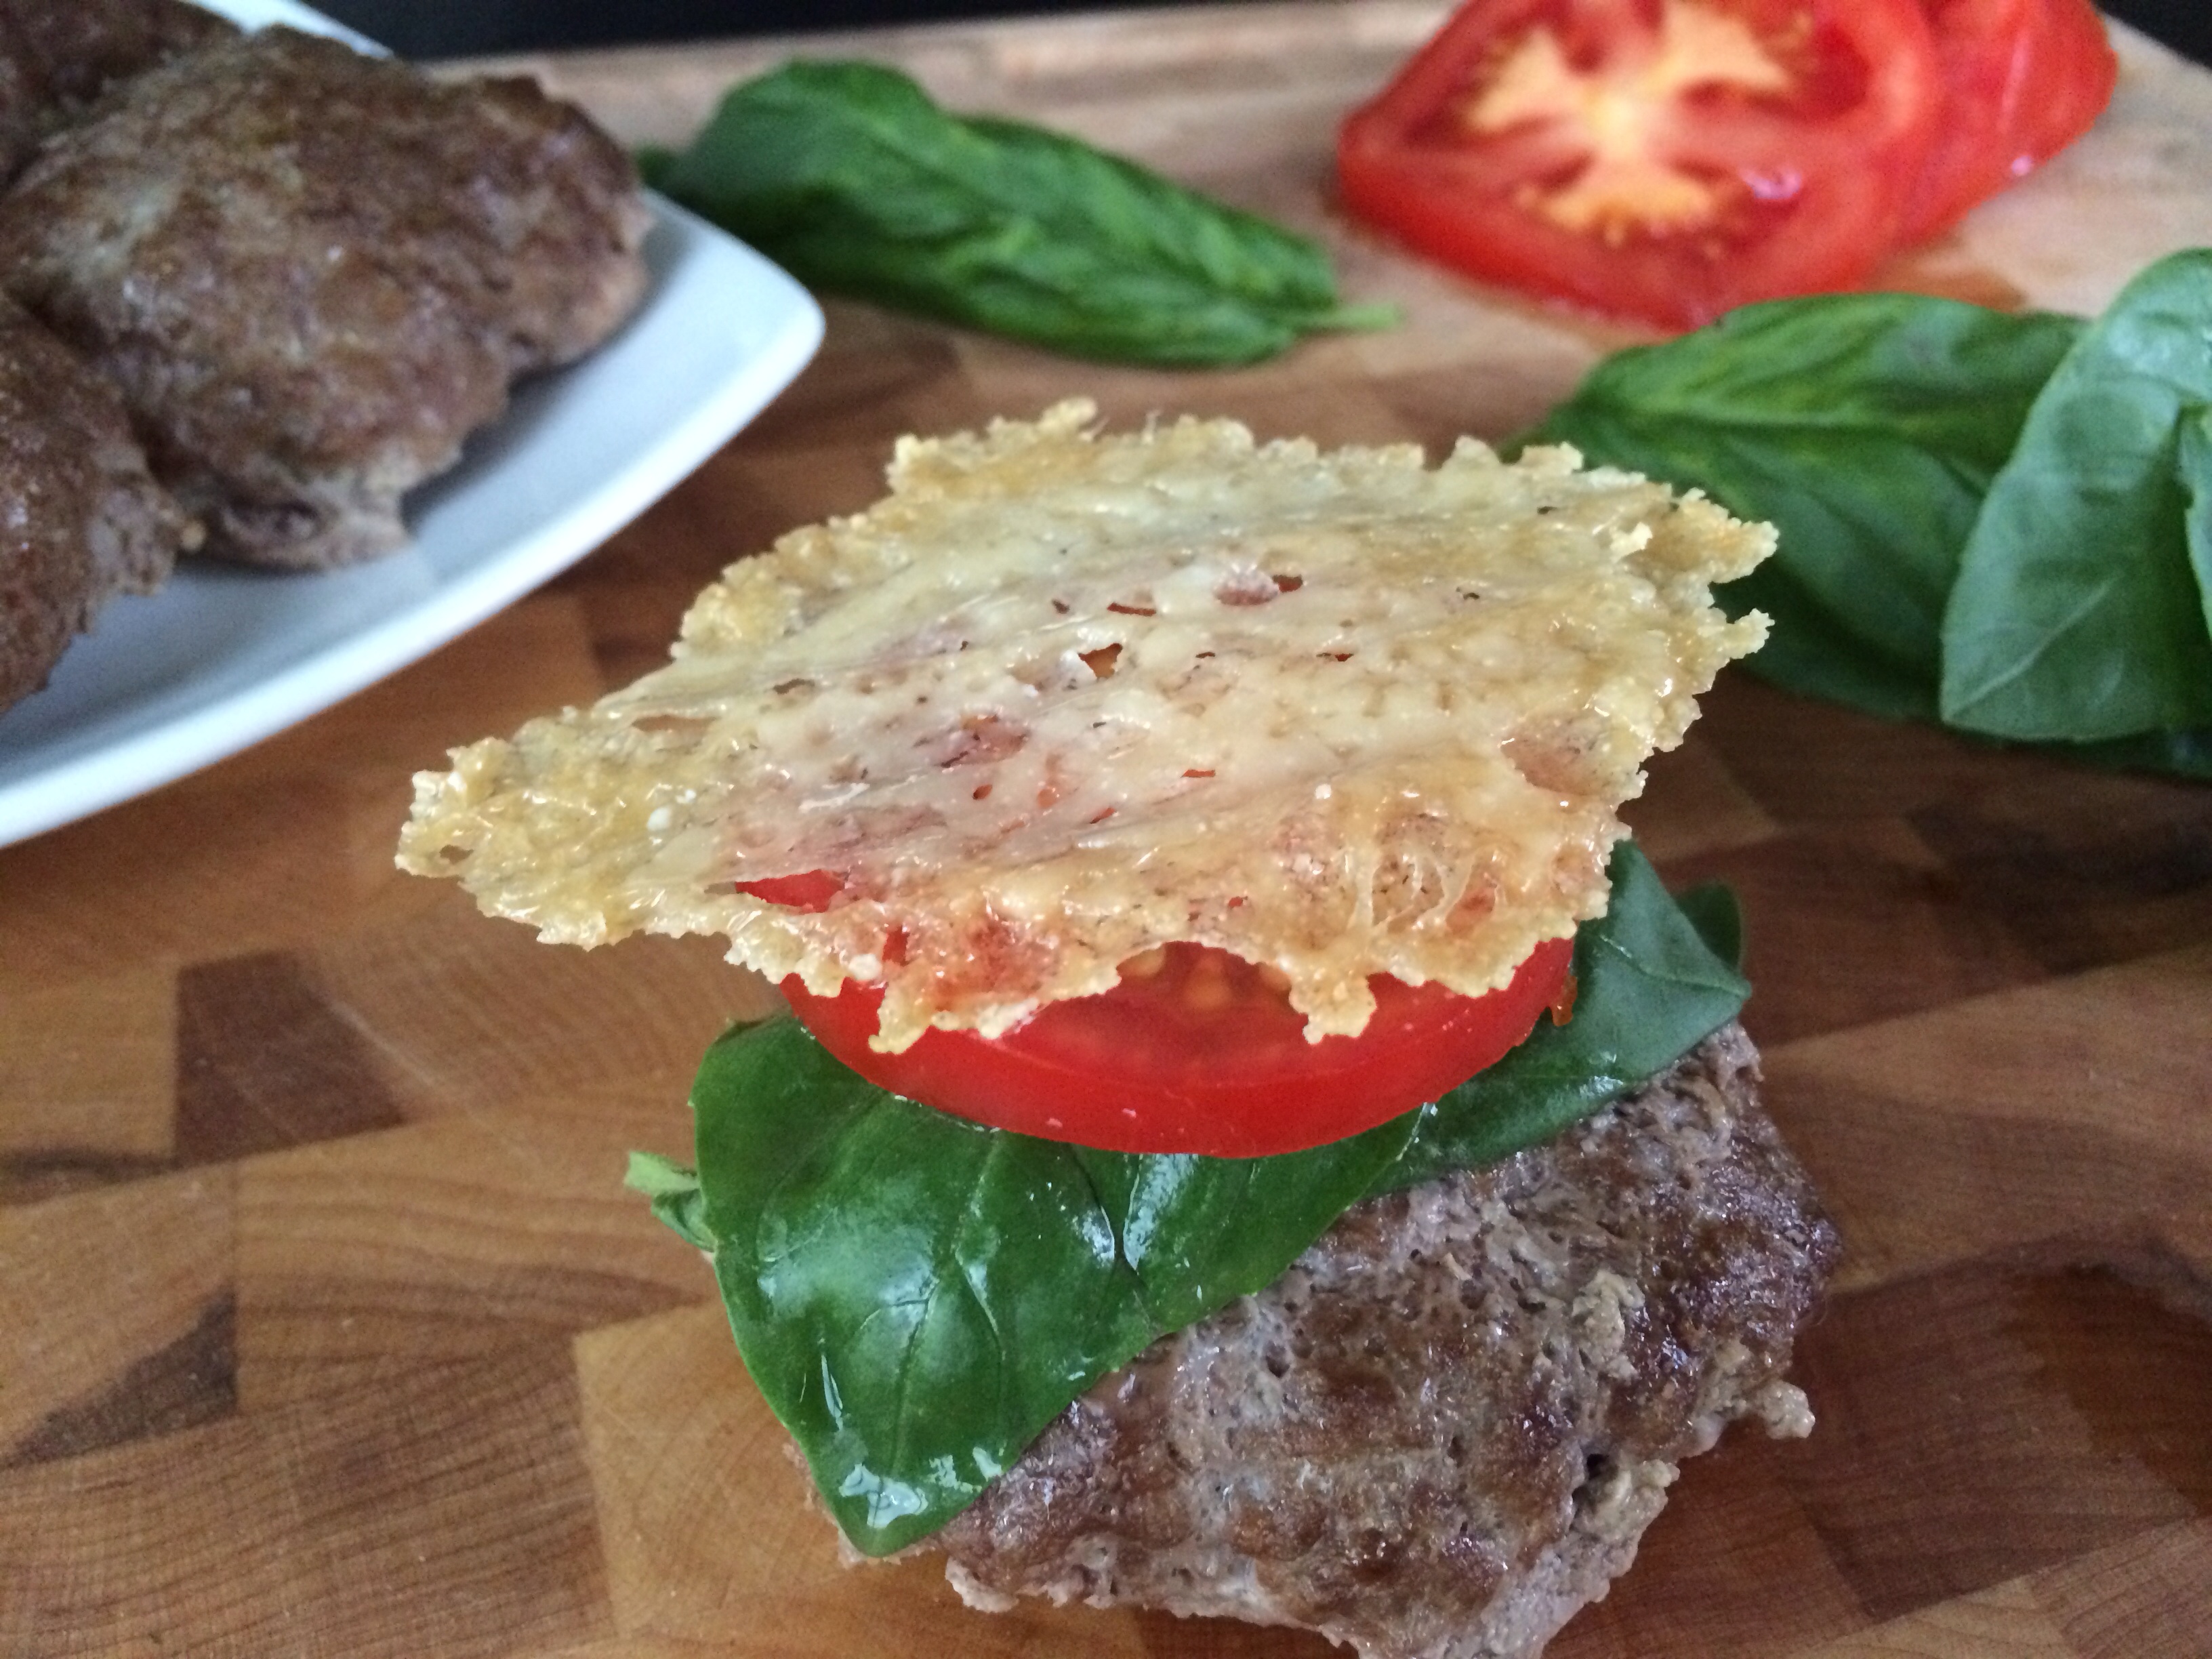
Handful of fresh basil or arugula
Pre-made pizza crust or recipe below!

Directions:
Preheat over to 400 degrees.

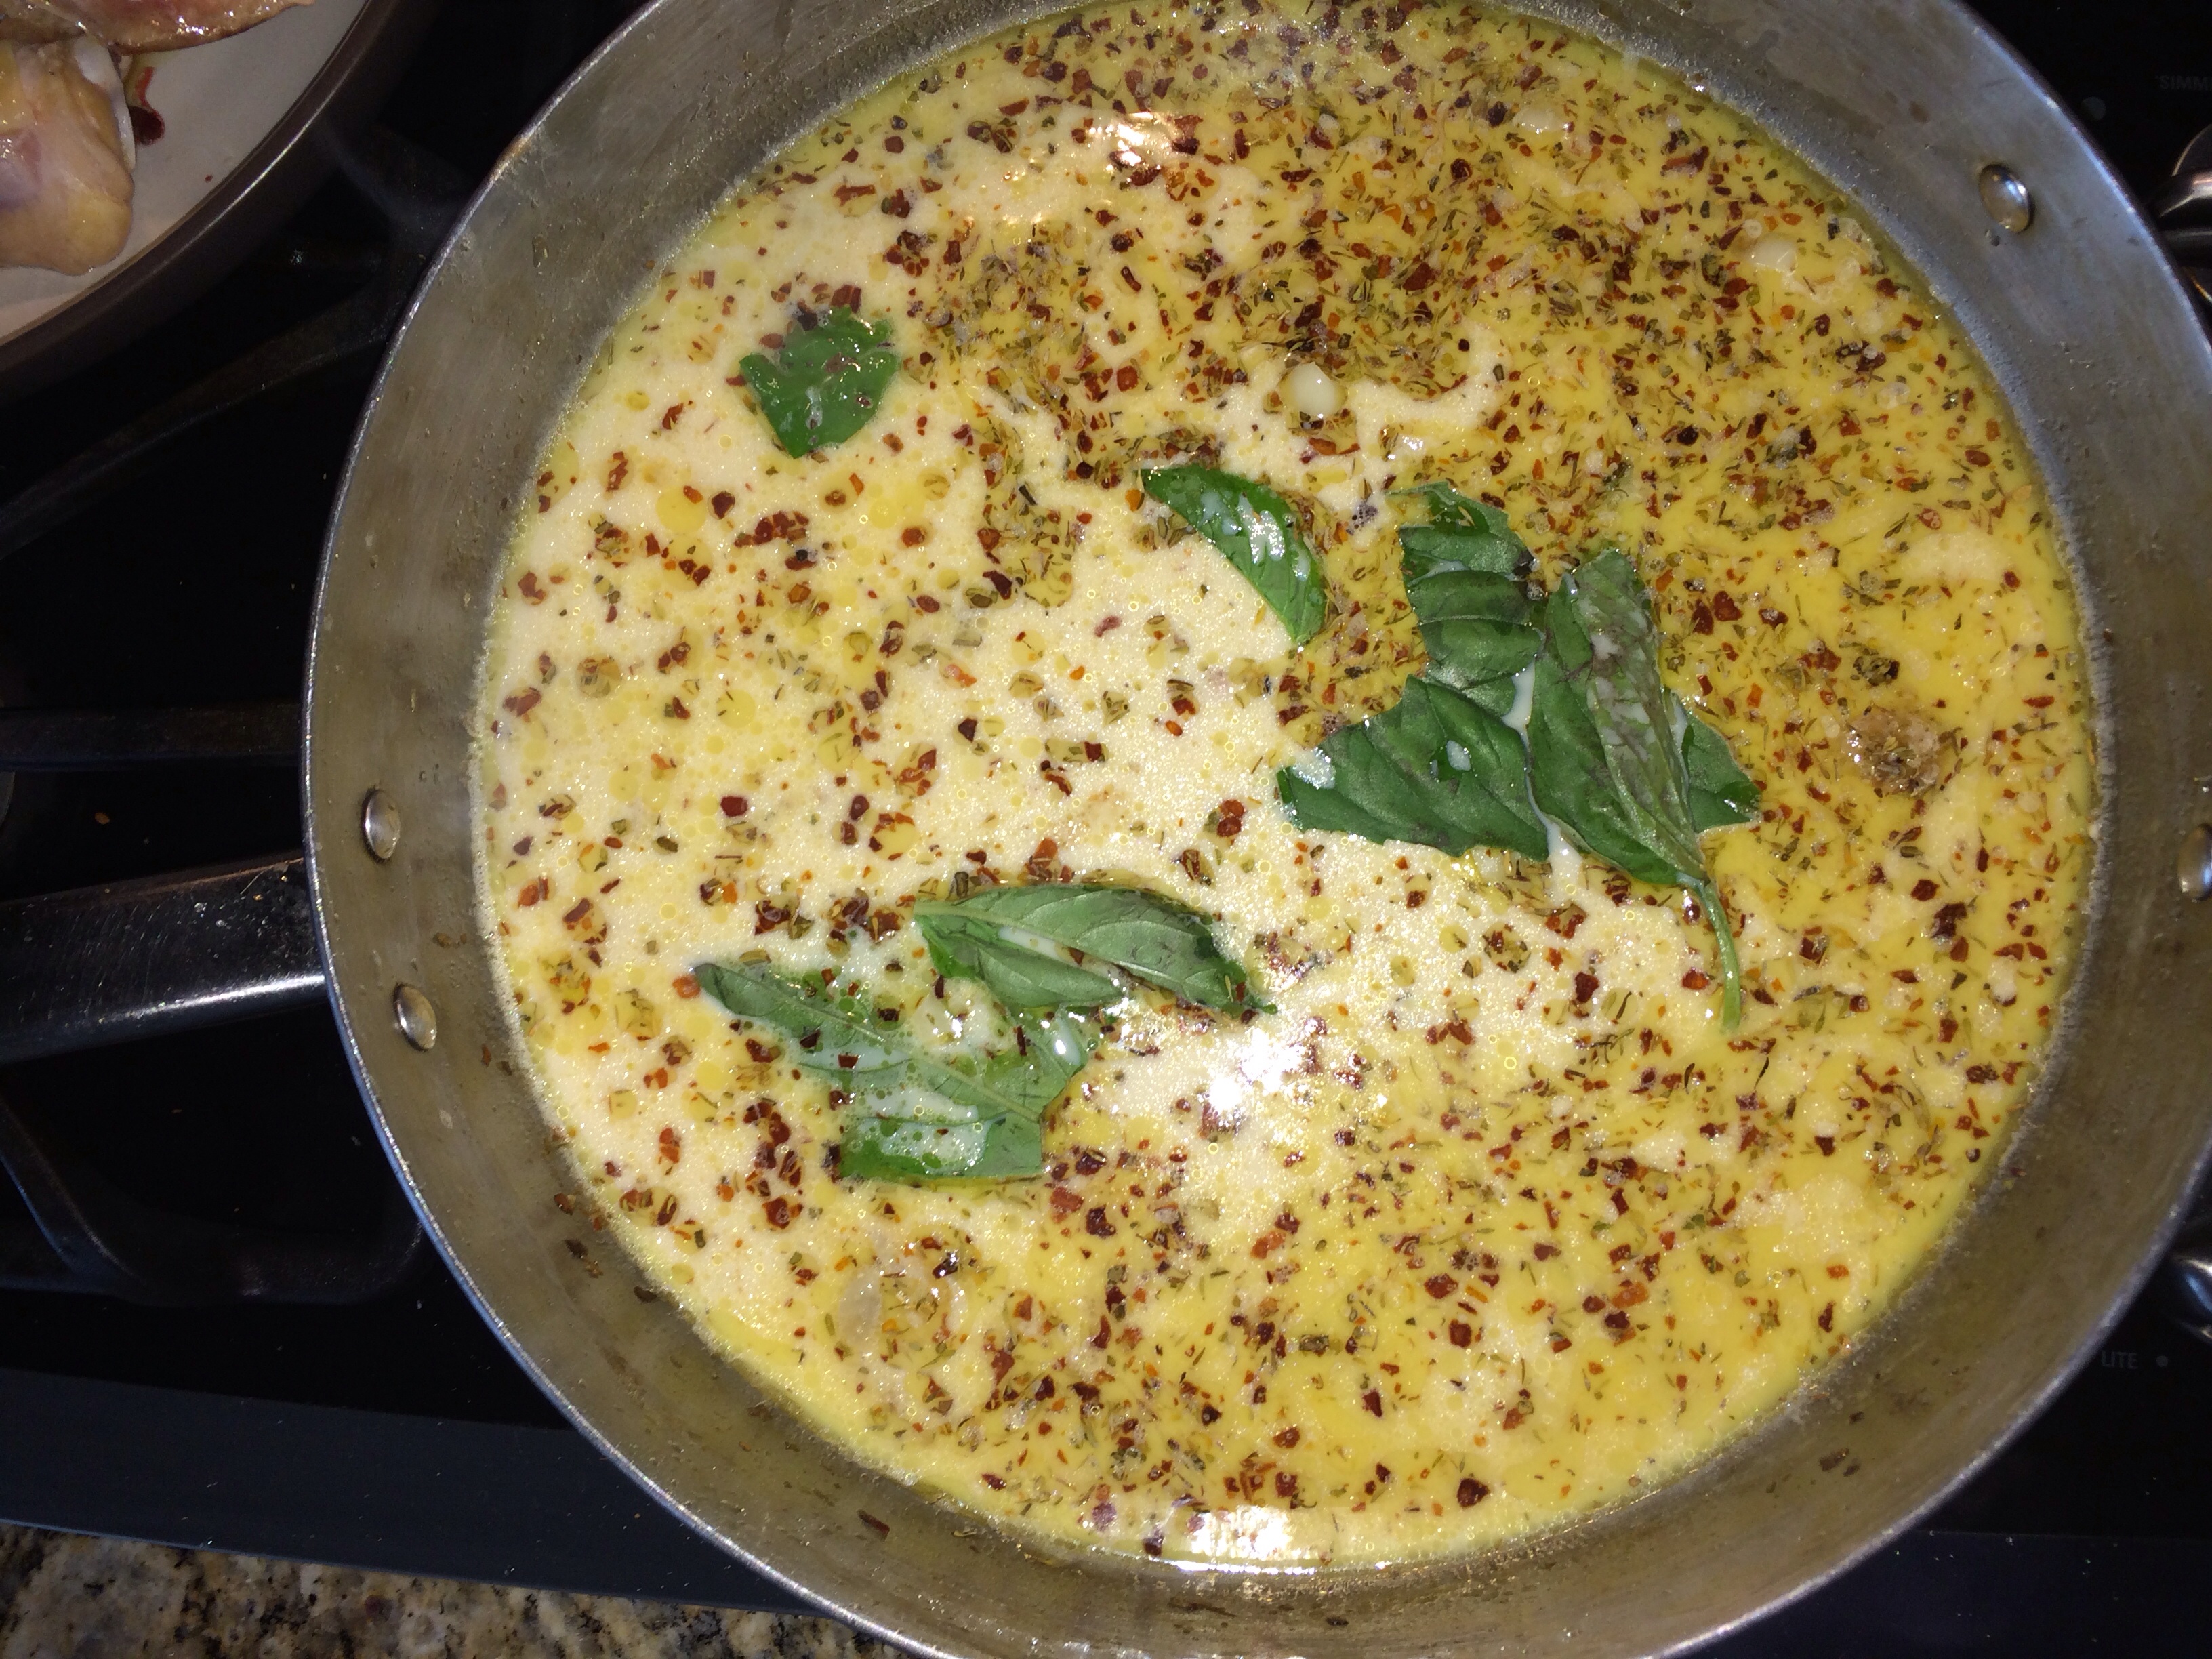
Heat olive oil in a large pan.

Add garlic, cook 2-4 minutes until aromatic.

Add clams, white wine, lemon juice, salt and pepper.

image

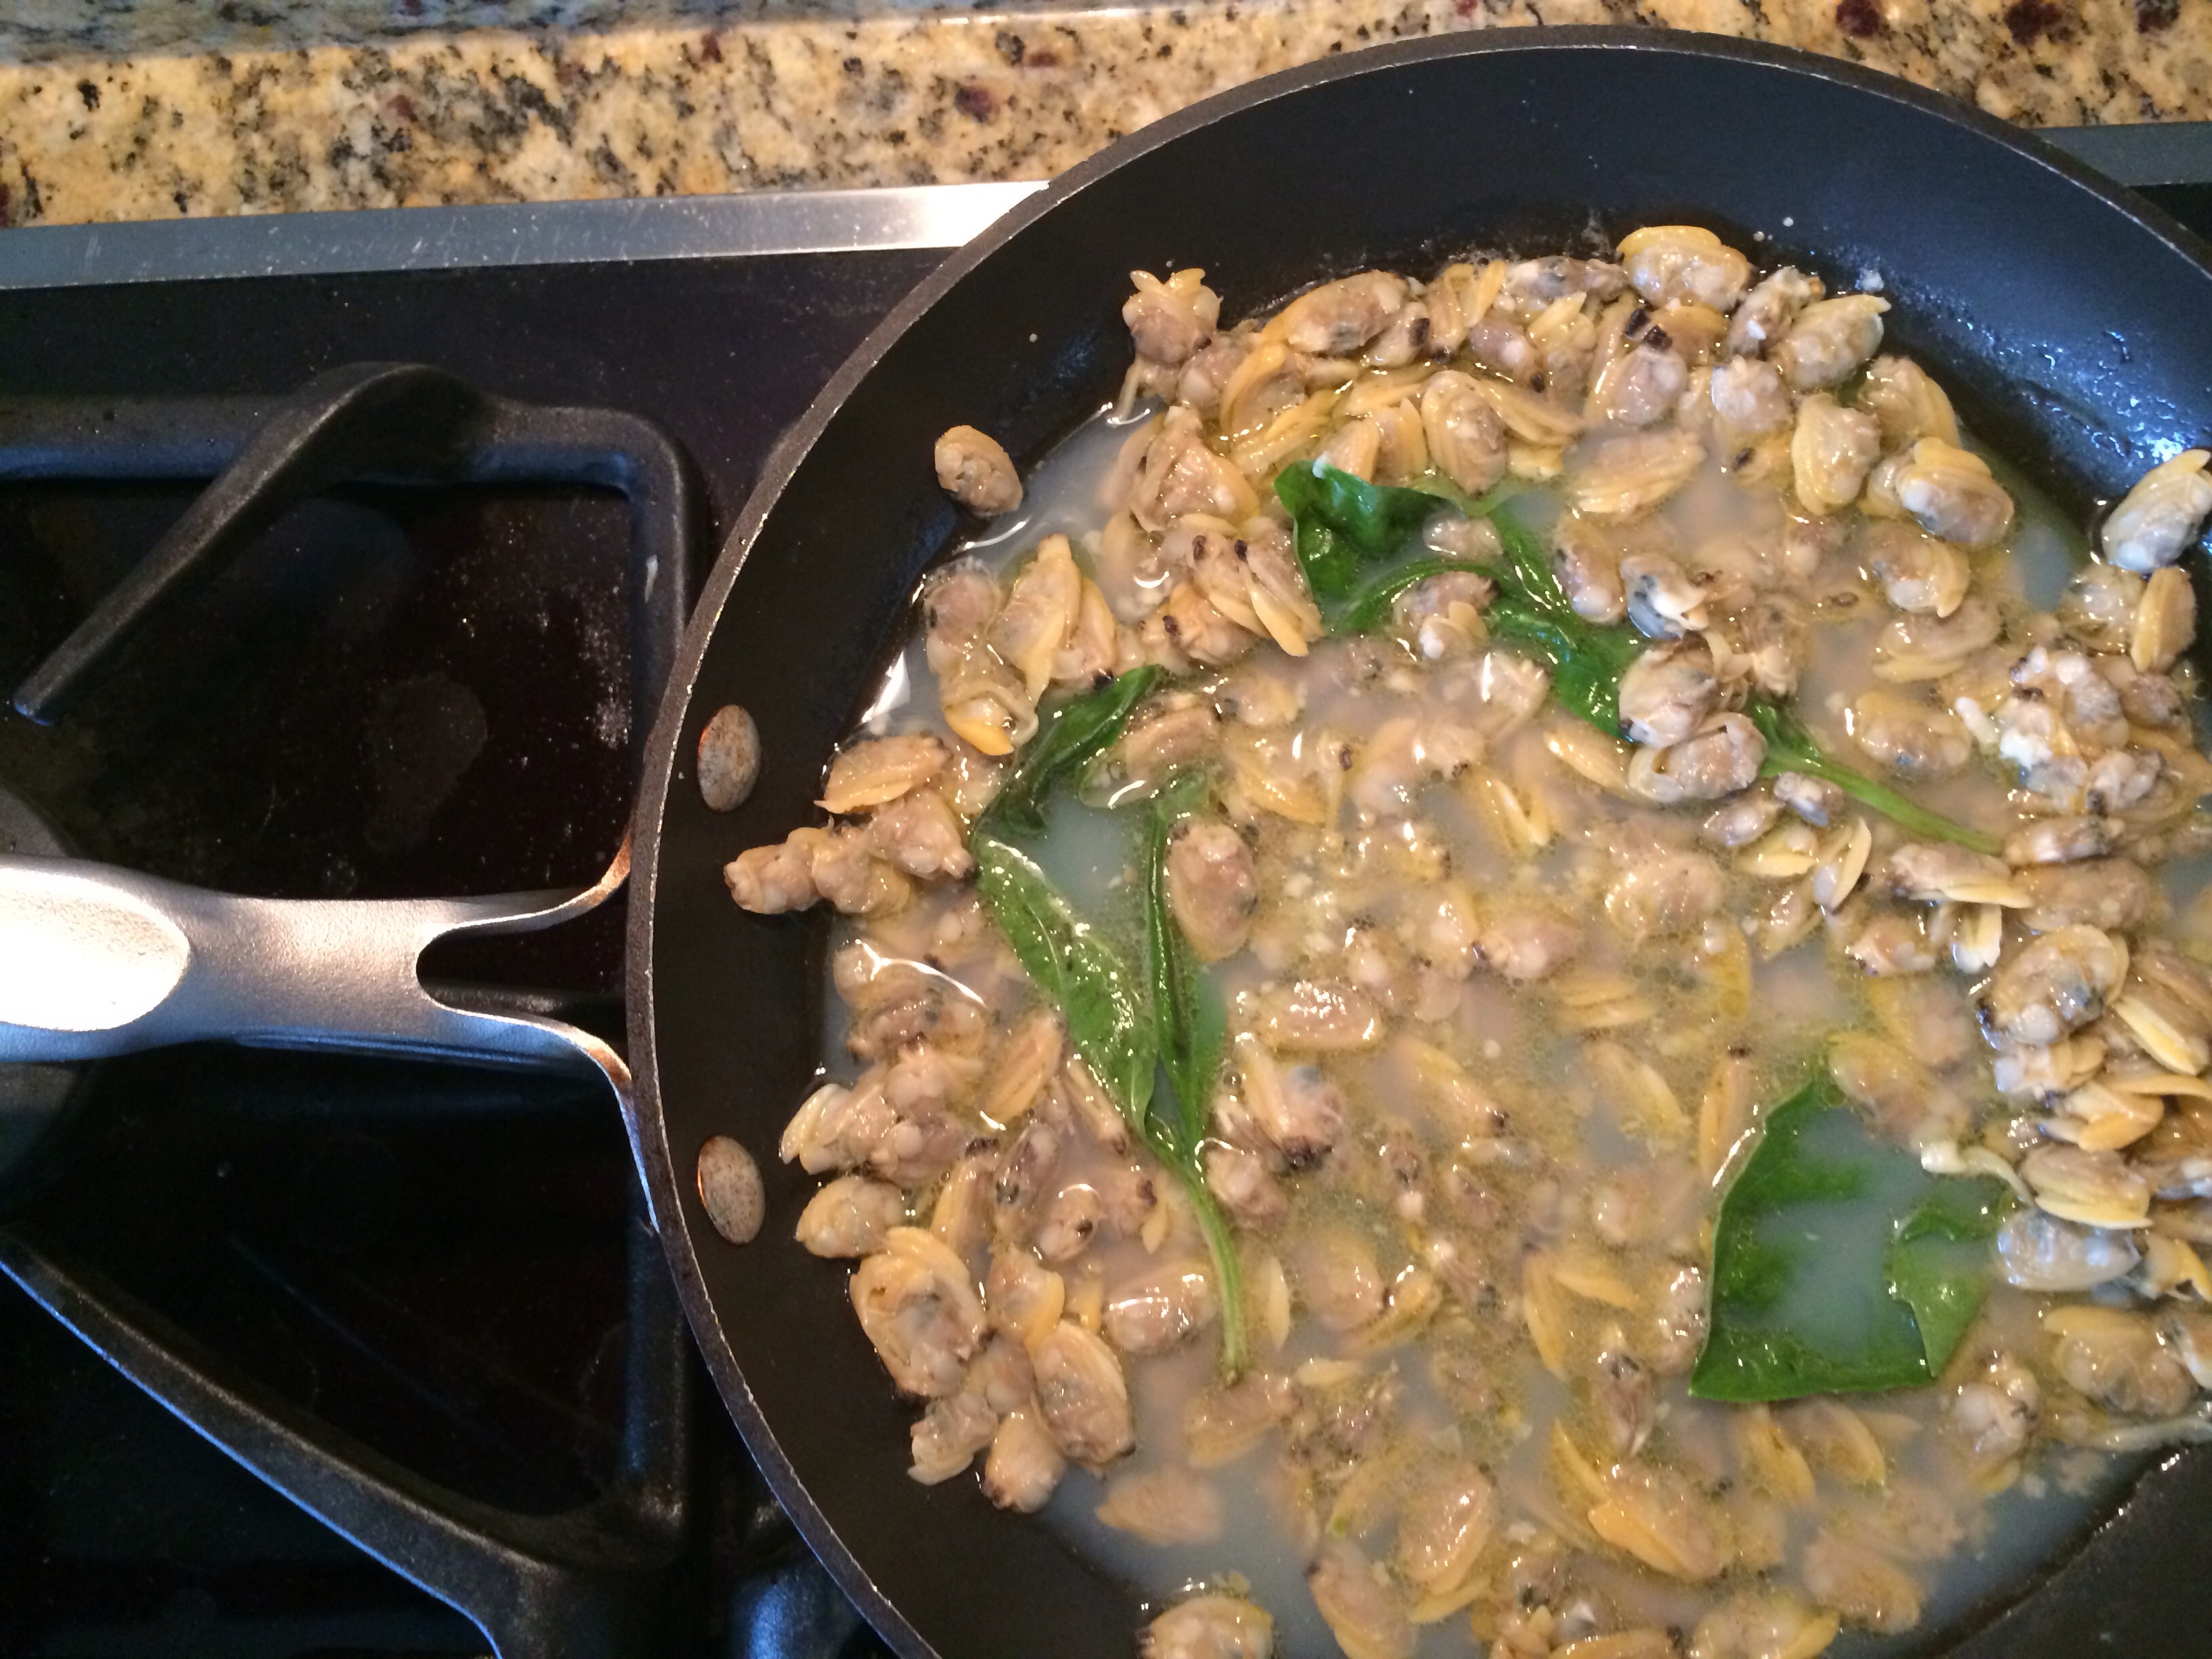
Lower heat and simmer until heated through.

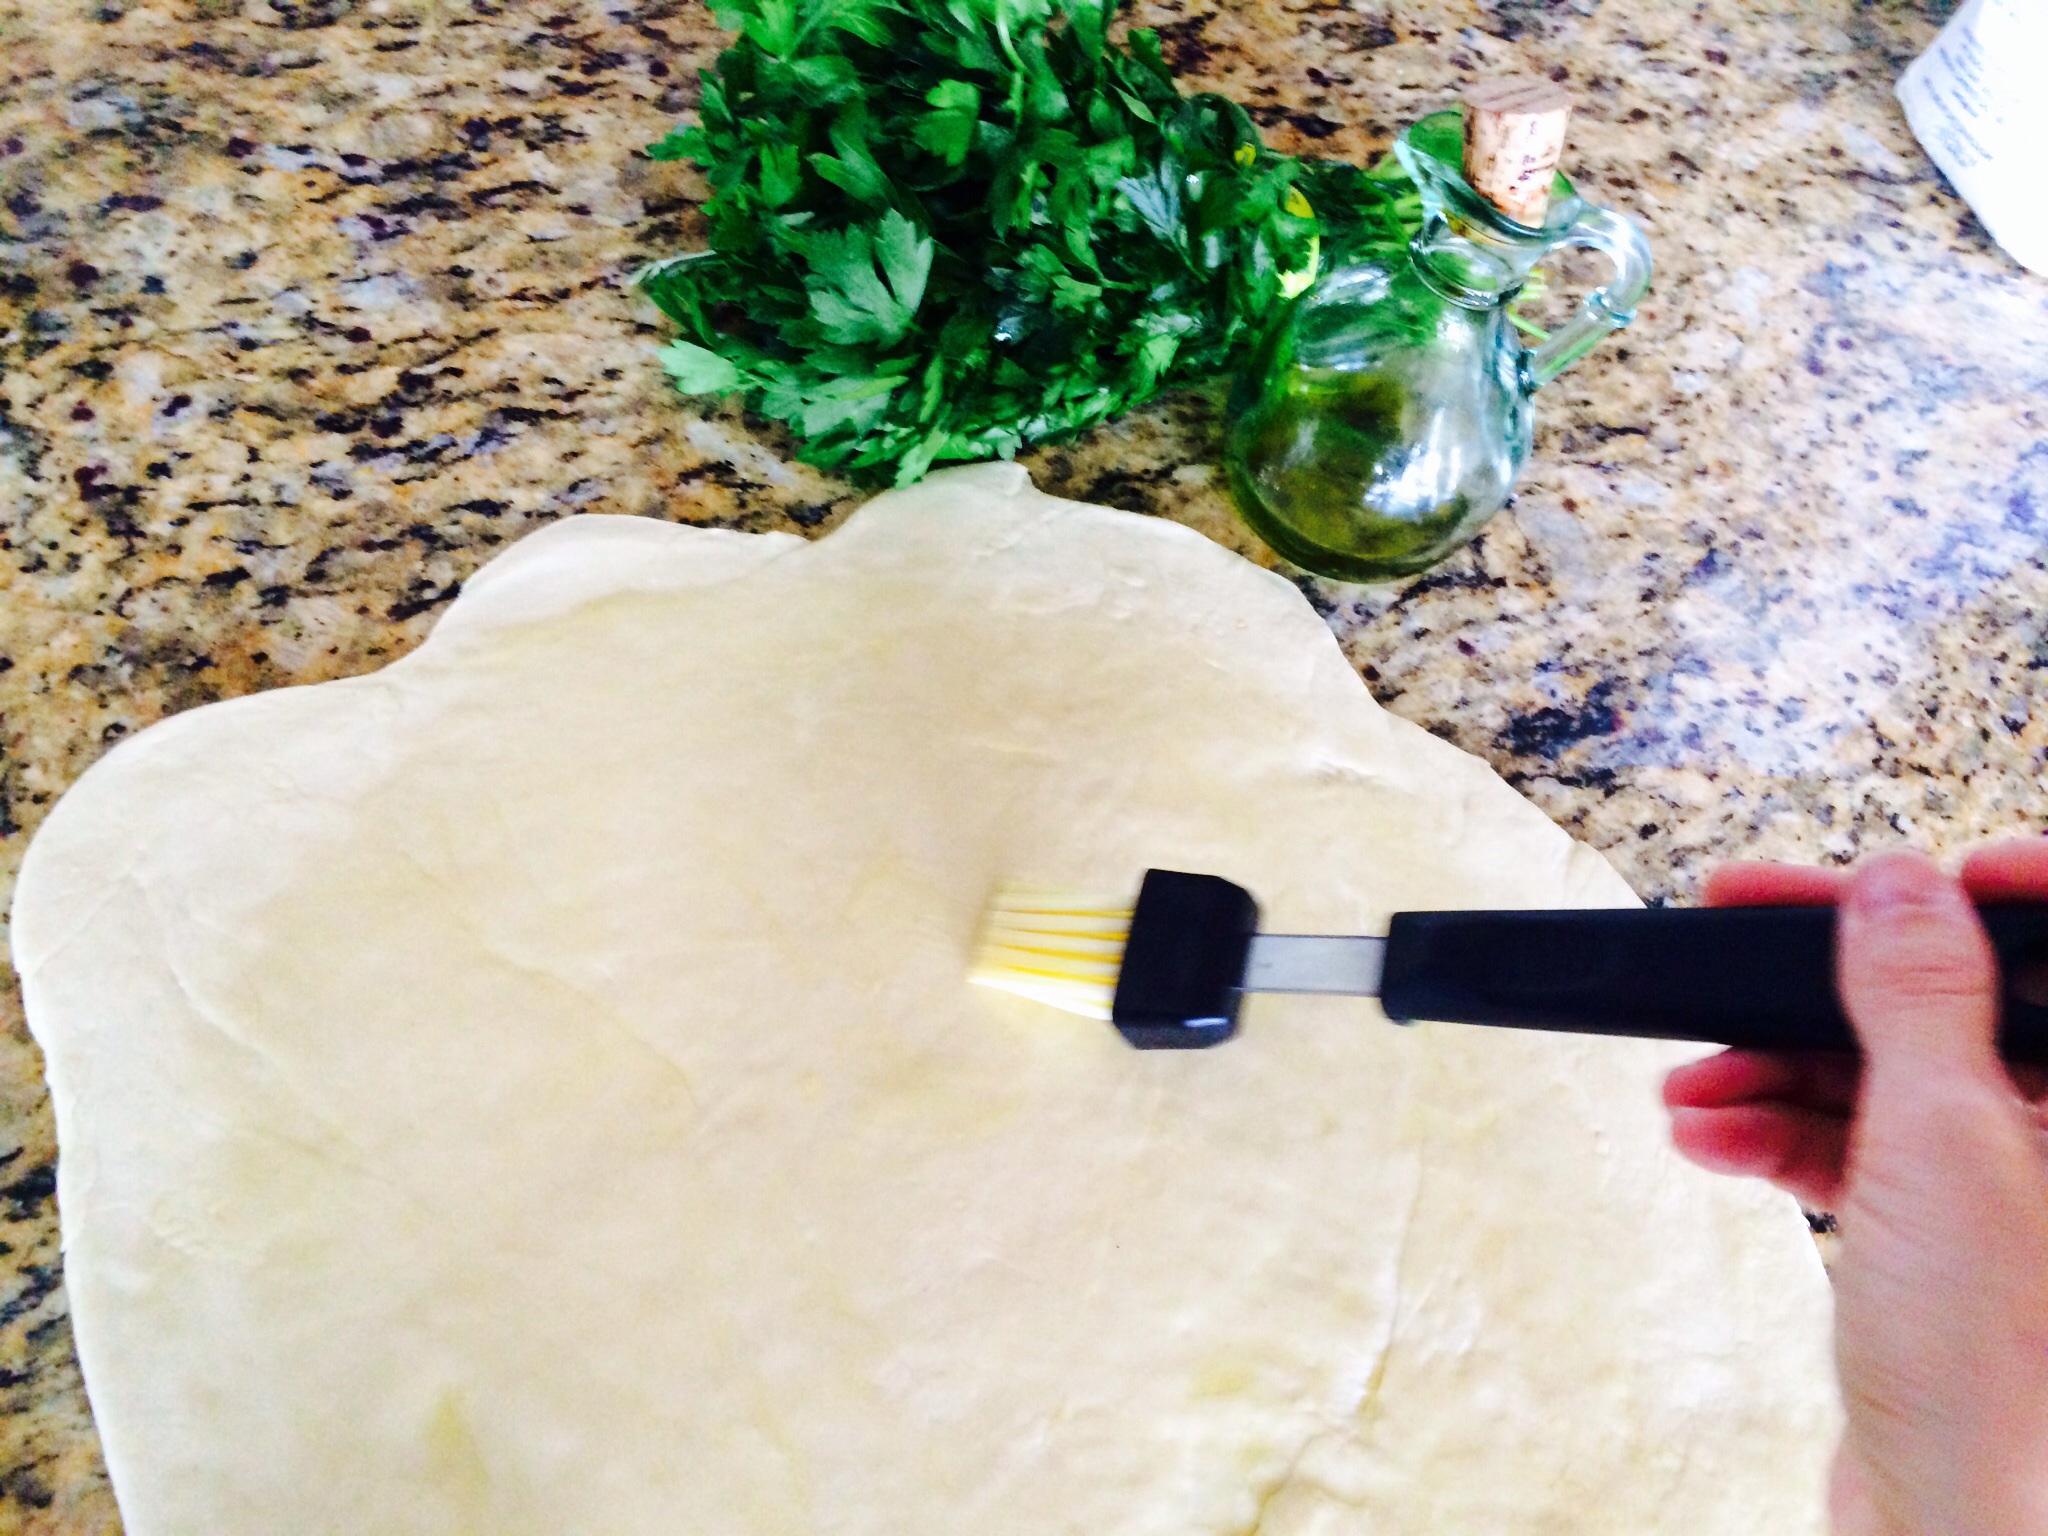
Brush pizza crust with olive oil.
image

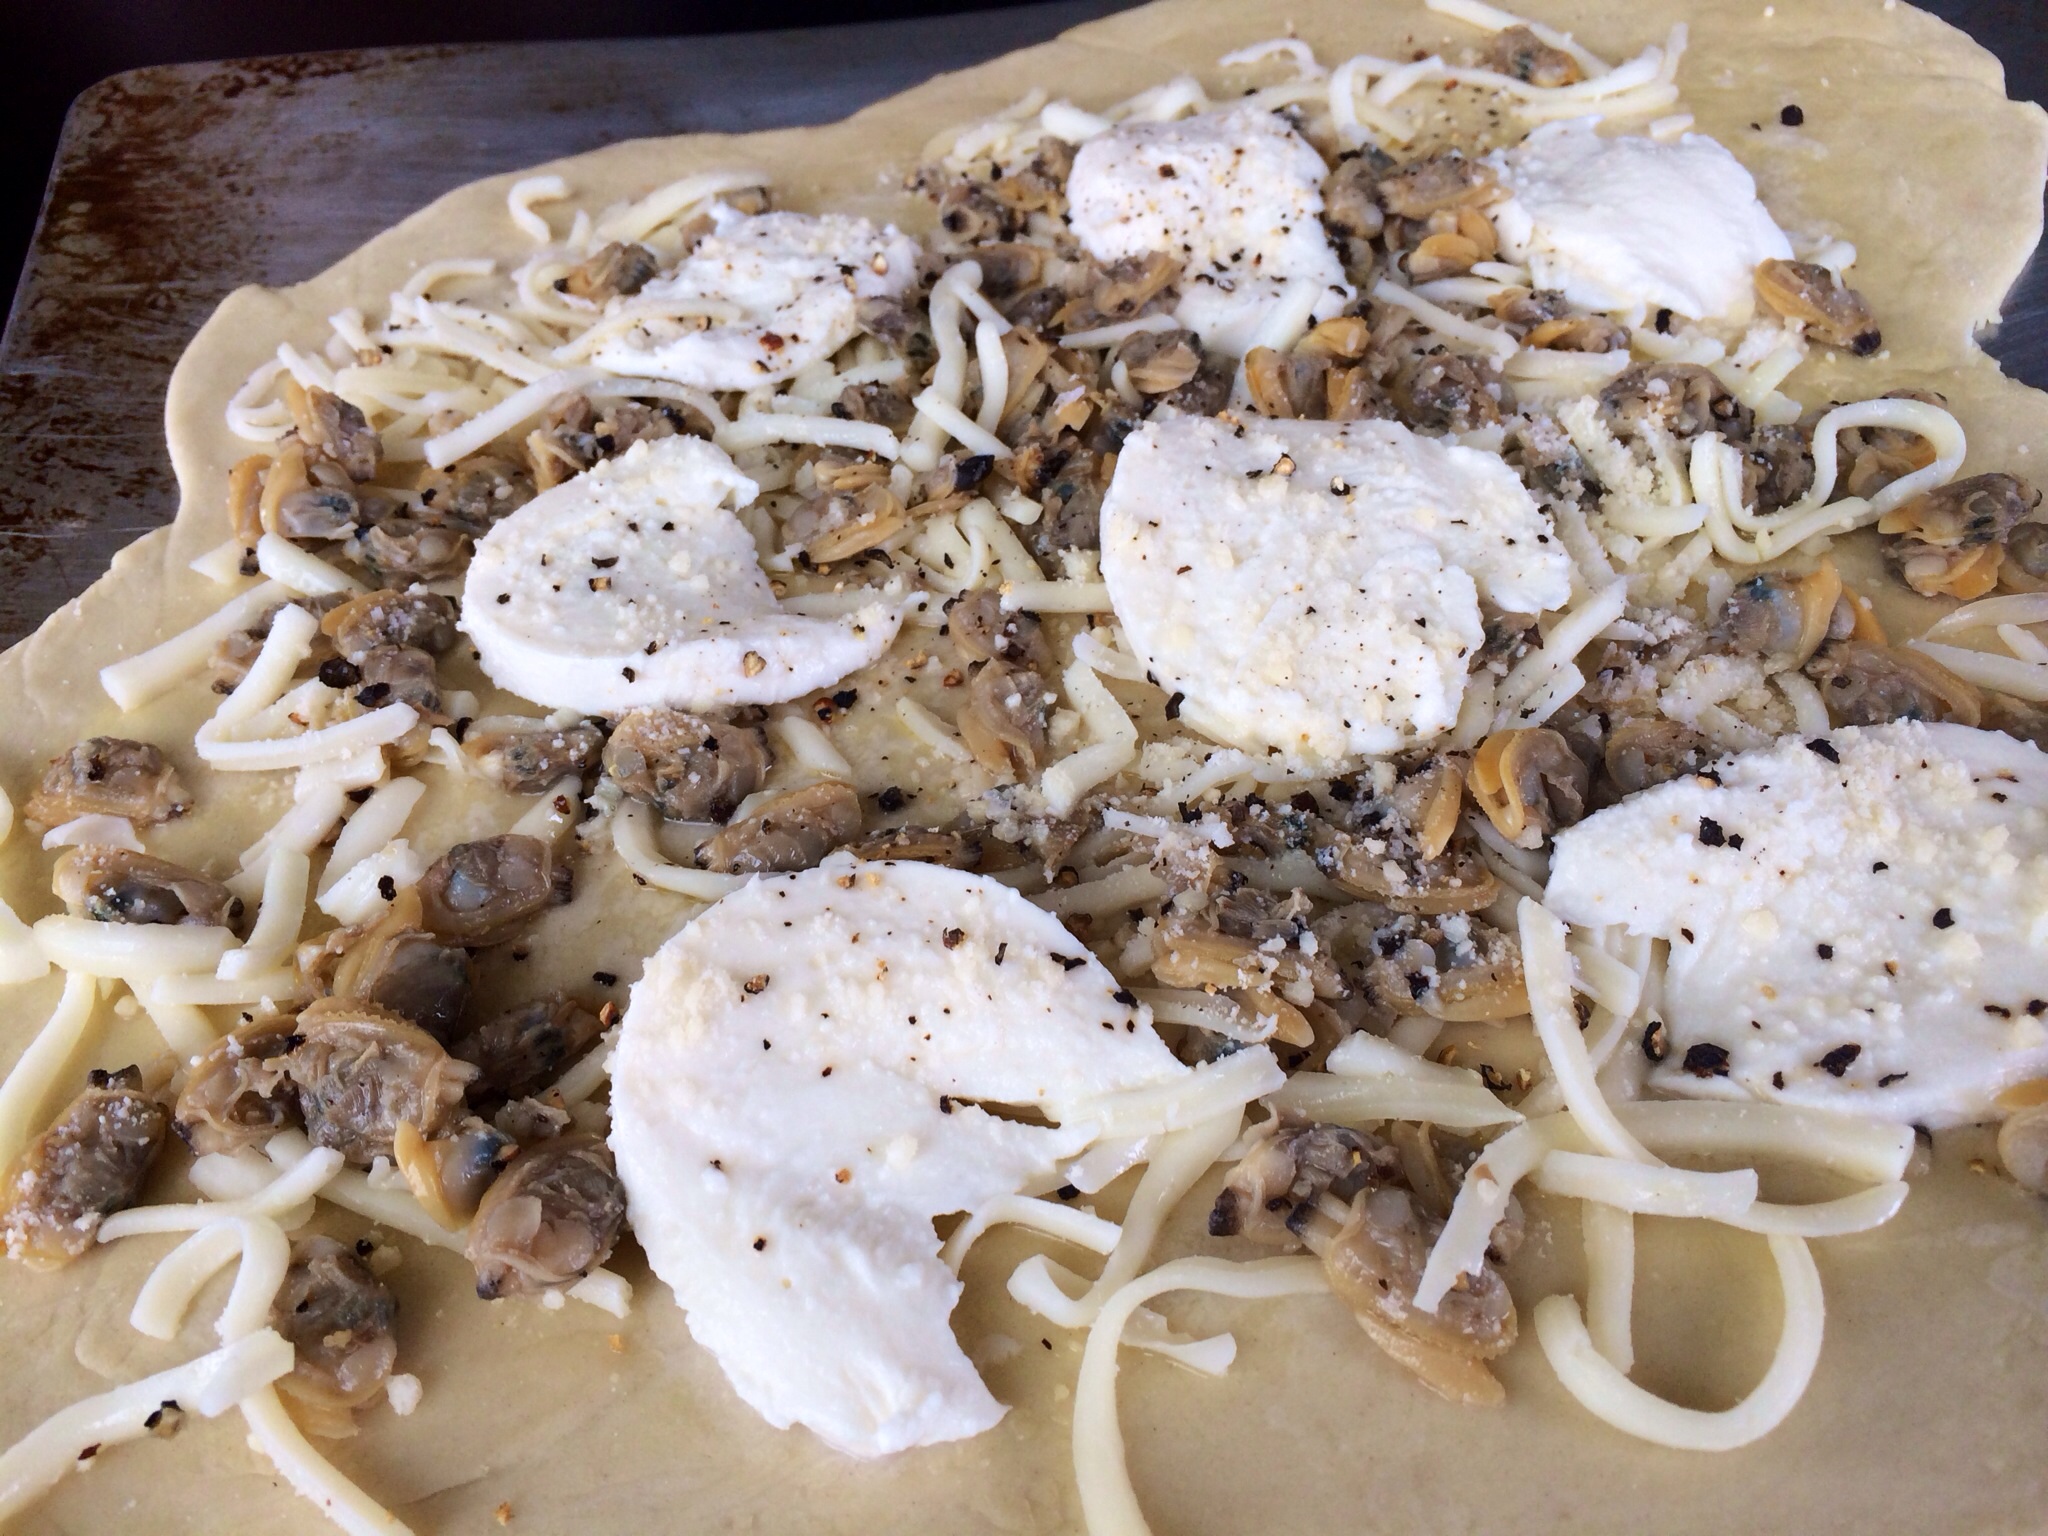
Top with shredded mozzarella/ provolone mix.

Add strained clams.

Top with fresh mozzarella slices and sprinkle with fresh grated parmesan.

image

Bake until crust is golden brown and the cheese is melted, approximately 12-18 minutes.

Top pizza with red onion, basil or arugula, fresh grated parmesan cheese, and sea salt.

image

No Yeast Easy Pizza Dough
Ingredients:
1-1/2 cup flour
1 tbsp. baking soda
1 tsp. sea salt
3/4 cup water
2-1/2 tbsp. olive oil

Directions:
In a large mixing bowl, mix flour, baking soda, and salt.
Make a volcano and fill the center with water and olive oil.
Gradually push the flour into the liquid little by little until well mixed.

image

Enjoy!
Ciao!

Fried Heirloom Tomatoes!

Traditional Southern fried green tomatoes are actually tart, unripened red tomatoes, breaded and fried in oil. Their firmness makes them perfect for frying! I was given some gorgeous, solid heirloom tomatoes that were so sweet, not mushy at all, so I decided to fry them for a sweeter version.  Of course topping them with parmesan cheese and fresh basil for a totally perfect mix of flavors!
Heirloom tomatoes are the best. Passed down from generation to generation, heirlooms’ taste will far exceed any tomato you find at the grocery store. Found in an array of colors, they all taste a bit different.

image
I made a Caprese salad last night using really ripened heirlooms. I’m not sure which ones tasted better yellow, orange, red/green striped, brown? They are all amazingly delicious!
Ok, back to frying them. So the trick is to use firm tomatoes, and fry them in a hot pan. This way the outside “crust” will be nice and crunchy.

image

Fried Heirloom Tomatoes
Ingredients:
2 firm heirloom tomatoes, sliced 1/4 inch thick
1 cup flour
1/2 tbsp. dried basil
1/2 tbsp. dried rosemary
2 tsp. garlic powder
2 tsp. onion powder
2 eggs, whisked
1 cup Panko breadcrumbs
3 tbsp. olive oil
salt/pepper
fresh grated parmesan cheese
fresh basil

Directions:

image

image

Add olive oil to pan and heat on high.

Mix flour, basil, rosemary, garlic powder, onion powder in a bowl.

Whisk eggs in a second bowl.

Add Panko breadcrumbs to a third bowl.

Prepare tomatoes by lightly salting slices, coating in flour, dipping in egg, and covering in breadcrumbs.

image

Add slices to pan, fry until golden brown on first side, then flip.

Remove slices, let oil absorb on a paper towel covered plate.

image

Top with fresh grated parmesan cheese, fresh basil, and serve!

Enjoy!
Ciao!

Chicken with Red Pepper Cream Sauce!

You will definitely be sopping up this sauce with some crusty bread! The red pepper cream sauce takes ordinary, boring chicken to a new level, but the real reason this dish is totally amazing is the cut of chicken. For a flavorful boost, use chicken thighs or legs instead of chicken breasts.  No need to worry about drying out, this chicken falls off the bone!!

image

To ensure crispy skin, the chicken is browned first in a pan, then roasted in the oven.  You can always pop it under the broiler at the end for an even crispier finish! It looks beautiful topped with fresh basil at the end. Simply serve it out of the pan!

image

Chicken with Red Pepper Cream Sauce

image

Ingredients:
6-8 chicken thighs
3 tbsp. olive oil +2 tbsp. for sauce
3 cloves garlic, finely chopped
1 small onion, finely chopped
1 cup chicken stock
1/2 cup heavy cream
1/4 cup fresh grated Parmesan cheese
1- 1-1/2 tbsp. red pepper flakes to taste
1/2 tsp. thyme
1/2 tsp. oregano
1/2 tsp. basil
1/4 cup fresh basil leaves
salt/pepper to taste

image

Directions:

Preheat oven 400 degrees.

Season chicken thighs with salt and pepper.

Heat olive oil in a large pan to medium high heat.

Add chicken skin side down and brown both sides, approximately 3-5 mins. per side.
Remove chicken from the pan and set aside. (Chicken will be just browned, not cooked through.)

To additional 2 tbsp. olive oil, add onion, garlic and red pepper flakes.
Golden garlic and cook onion while continuously stirring approximately 2-3 minutes or until you smell the red pepper and garlic.

Stir in chicken stock, heavy cream, Parmesan, thyme, oregano, and basil.

Bring to a boil.
Reduce heat to simmer until thickened, approximately 5-7 minutes.

Add chicken back to skillet.(Sauce should only cover the bottom of the thighs.)
Roast in the oven until cooked through, 25-35 minutes.

image

Top with fresh basil and serve!
Ciao!

Best Of Pittsburgh Summer Restaurant Week 2015 & More!

The rules of Pittsburgh Restaurant Week are totally simple.
1.) Try new restaurants.
2.) Order something new at one of your faves.
3.) Familiarize yourself with an unfamiliar part of the city! Who knows? You just might go back to eat, to play, to shop!

IMG_3538

WARNING: Plan your summer vacation the week before summer restaurant week! My eating has not slowed down at all, actually, I can’t stop. I am typing to you with my toes in the sand at a resort on Grand Bahama Island. I have one bathing suit that fits and my evening wear consists of flowing, beautiful, amazingly flattering maxi dresses.

IMG_3667

Let’s rewind…
It all began with the Summer Restaurant Week Kickoff Party!
Yummy bites are served to guests cocktail party style and participating restaurants go head to head for the “best preview” award.

IMG_3372

There were many amazing showings. Here are a few of my favorites!

Atria’s
IMG_3367

The Wooden Nickel
IMG_3354

Matteo’s – I visited Matteo’s for the fist time during summer restaurant week 2014 and 20 times since! I didn’t even take photos because I love everything at this restaurant. Bold statement? Nope, I mean everything. My all time favorite entree at Matteo’s… The porcini cappelletti!

The Porcini Cappelletti... Wow!
The Porcini Cappelletti… Wow!

Bill’s Bar and Burger
IMG_3353

Täkō

IMG_3344

And the winner was Pork Belly! Pan, a brand new Asian fusion restaurant in Lawrenceville. I have not had the pleasure of dining, but the Andora restaurant family’s pork belly preview was awesome! Can’t wait to visit!

IMG_3348

IMG_3366

My first Summer restaurant week 2015 menu? Sunday Brunch at Verde Mexican Kitchen and Cantina! After visiting for Winter Restaurant Week I knew I had to go back!

I had the chilaquiles…again!!! Definitely worth the trip!
IMG_3417

Monday night was the PRW Blogger Dinner at Grand Concourse! Oldie but goodie for sure. Ok, I forgot how good! I enjoyed a delicious meal and and wonderful night out with new and old friends.

I shared the firecracker shrimp with my new blogger friend Briana White of Breelicious Bites. Check out her blog! She just hosted a mac’n cheese contest!
IMG_3429

Followed by the Summer Chopped Salad

IMG_3432

Roasted Sirloin with Sweet Pepper Chutney and Chili Oil

IMG_3435

And finished with the Creme Brûlée…
IMG_3438

My next stop on the PRW Train was Paris 66 Bistro I cannot believe I have not visited this French gem.

IMG_3469

I enjoyed the wine and French baguette.
IMG_3473

French Onion Soup…
IMG_3480

Steak and Frites
IMG_3475
Cooked to perfection!
IMG_3478

And the cholocate mousse …
IMG_3479

Perfect for a lunch stop, date night, or family dinner, visit Paris 66 and its surrounding growing community of Eastside Pittsburgh!

Friday I dined at Sarafino’s in Pittsburgh’s Crafton suburb. Papa bear to my Matteo’s in Lawrenceville, Joe Caliguire does not disappoint. It was the restaurant’s first time participating in restaurant week. I invited a few of my faves to join me for a totally awesome smorgasbord. Blog post coming soon!!

I swore I was never eating again, but the kids and I were running errand Saturday afternoon and ended up at Firehouse Subs…super yummy! This franchise was started by firemen…and they have built the most amazing combinations!

Here was my choice the Sriracha Beef…
IMG_3558

I guess this post is really saying, try something new! Support your local restaurants!
And in Pittsburgh, we are sooooo lucky to have the best!
Enjoy!
Ciao!

Summer Zucchini Salad with Honey Lemon Vinaigrette!

Do you have zucchini coming out of your ears? I definitely do! It is that time of year when I have had enough- totally zucchini breads, zucchini boats, and zucchini breakfast-ed out! What else can you make? There is always the chocolate-zucchini craze of hiding the veggie in chocolate cake, muffins, cookies or brownies. Chocolate is always a great idea, but how about a salad sans lettuce and a smooth and summery homemade vinaigrette? Now that sounds perfectly summer!

imageimage

Summer Zucchini Salad
(Serves 4)
Ingredients:
2 medium zucchini
2 vine ripe tomatoes
1/2 cup crumbled goat cheese
1 lemon
salt/peper to taste

image

Honey Lemon Vinaigrette
Ingredients:
1 tsp. garlic powder
1 tsp. dijon mustard
6 lemons- squeezed for juice approx. 1/4 cup lemon juice
2 tbsp. honey
1/2 cup olive oil
1/4 cup grapeseed oil or canola oil

image

Directions:
Peel zucchini with a vegetable peeler in long strips and place into serving bowl or platter.(I roll-up some of the strips for easy eating and because it adds to the beauty of the dish.)

image

Cut tomatoes into wedges and add to the salad.

Sprinkle with 2-3 tbsp. crumbled goat cheese.

For dressing:
Whisk all ingredients except oils.


Add oils, lid, and shake vigorously until well mixed.

Top salads with 2 tbsp. of dressing and squeeze a halved lemon over salads.

Add salt and pepper to taste.

image

Enjoy!
Ciao!

Roasted Chicken Salad

For a refreshing summer luncheon or back to school favorite , homemade roasted chicken salad wins the “hits the spot” award. I cannot stand a wet, super mayonnaissy, yogurty, sour creamy (eek!) consistency. So I add the minimum amount ever of mayonnaise to moisten – I know, there is seriously no other word to be used here- some sweet grapes and the crunch of celery to the dressing.

image

Super short cut. You can totally buy a rotisserie chicken at the grocery store. Take out bones and skin, shred or dice. I like to make a whole roasted chicken for dinner and make this chicken salad with the leftovers. That is why I say 1/2 chicken because that is usually what’s left! Smooth and delicious with a crunch, this roasted chicken salad can easily become your go-to recipe!

image

Here it is…

Roasted Chicken Salad

Ingredients:
1/2 chicken
2 tbsp. olive oil
salt/pepper
1/2-1 cup mayonnaise
1-1/2 tsp. dill
1 cup grapes, halved
3 stalks celery, chopped

image

Directions:
Preheat over 350 degrees.

Rub chicken with olive oil and sprinkle with salt and pepper.

Bake 35-50 minutes, until chicken is cooked through.

IMG_3178

Cool chicken and dice or shred.

Mix the dressing by adding your comfortable amount of mayonnaise, grapes, celery, and dill.

Fold in diced chicken and mix well.

Add more mayo if needed! Remember, I like my chicken salad on the dry side so feel free to add away!

Chill and serve with crackers or on your favorite bread or roll!

IMG_3297

Enjoy!
Ciao!

Walleye Tacos With a Roasted Corn Peach Salsa!

My neighbors are awesome fishermen and who do you think gets a bag of fresh caught fish after the trip? The neighborhood food blogger of course. Ha! Thank you so much! The fresh walleye I was given this week soaked up the marinade beautifully and made a delicious base for some fresh fish tacos.

image

I made a totally amazing roasted corn and peach salsa by cutting spicy pan roasted corn on the cob off the cob and adding the sweet flavors of a diced peach, a small onion, and a handful of chopped chives. Fresh squeezed lime juice pulled it all together!

image

Seriously, Pittsburgh might just have a new “thing”…fish tacos!
Fish tacos are most definitely one of my favorite dishes to order out in Pittsburgh.  Believe it or not,  many of our restaurants have nailed a fabulous fish taco entreé! Some of my favorites…Penn Avenue Fish Company, Kaya, Täkõ, and Round Corner Cantina. All totally exceptional! Of course I make them at home, too!

image

Walleye Fish Tacos
Ingredients:
1-1/2 lb. raw walleye fillets
1 lime
1/2 cup fresh cilantro, chopped
1 tbsp. chili powder
1 tsp. cumin

Directions:

image

Cube raw walleye.

image

Mix lime juice, cilantro, chili powder, and cumin in a mixing bowl.

Add walleye cubes, coat with marinade and refrigerate.

image

Heat a pan and cook walleye cubes until just cooked through- pink turns white and flake with a fork.

Roasted Corn and Peach Salsa
Ingredients:
2 corn on the cob
1 peach, chopped
2 pats butter
2 tsp. cayenene pepper
1 small onion, finely chopped
1 tbsp. finely chopped chives
1 tsp.cilantro or parsley, chopped
1 lime

image

Directios:
Roast buttered corn in a pan or on the grill until desired doneness.
Sprinkle with cayenne pepper.

Cut corn off the cob after it cools a bit.

image

Add onion, chives, cilantro or parsley to corn.

image

Squeeze the juice of one lime into bowl.

Fish Taco Sauce
1/4 cup sour cream
1 tbsp. sriracha

Mix together and add more or less sriracha to taste

image

Build your taco with your favorite flour tortilla.
Add the roasted corn and peach salsa, and top with sriracha sauce.

image

Enjoy!
Ciao!

Sushi 101!

IMG_1246

I totally love sushi! Beautiful colorful sushi rolls, the variety of fresh fish, and the artistic presentation most definitely put sushi making into the art category. Having never attempted to making sushi myself, last week I had the opportunity to take a Sushi making class- part of the Art Institute of Pittsburgh’s Get Creative program.

IMG_3106
My first roll ever! Ahhh!

IMG_3074

IMG_3104

The talented Chef Aaron Hoover led the class by demonstrating and explaining each step. I attended with my food blogger friend Tasha from The Food Tasters Pittsburgh. We started with the sushi, the rice.

IMG_3082

So sushi rice, a Japanese rice, is cooked, then mixed with a heated vinegar- sugar -salt mixture. The mixture is added while the rice is being fanned to cool it down to create a shiny rice.

IMG_3099

We each had our own stations set-up and prepped with cutting boards, knives, sushi must-haves (pickled ginger, soy sauce, wasabi), and mixing bowls with bright vegetables and fish to add to our sushi rolls.

IMG_3102

We chopped a few of the vegetables with Chef Aaron’s instruction. It’s always really cool to see how a pro chef chops a bell pepper. Bonus! You don’t even need to pick out the seeds his way. Just chop the sides of the pepper on the indents leaving the top, all of the seeds, and fleshy middle in tact as the waste. Voila! Awesome!

IMG_3088

We made various types of sushi, maki, futomaki, temaki, nigiri, and gunkan sushi. A bamboo rolling mat was provided and we got to take it home!

IMG_3107

IMG_3109

IMG_3110

Inside Out Rolls look so beautiful! Especially with the addition of some black sesame seeds.
I know super fancy, right?

Cones – Temaki Sushi

IMG_3111

IMG_3112

IMG_3113

We even learned how to prepare miso soup! By including stories of Japanese culture, explaining Japanese cooking ingredients, and making the sushi class fun, Chef Aaron was a great instructor. I loved this class and can’t wait to explore other new genres of cooking! Cajun, Creole, and Chinese to name a few! We ate and took home a ton of sushi, recipes, and instructions!

IMG_3083

The best part for me…we didn’t have to clean up! HA! Just cook and take your sushi home, leaving the mess.

Other offerings include photography, art, and fashion!
Check out The Art Institute of Pittsburgh’s Get Creative program!

Does your city offer these “creative” classes? I would love to hear about it!

IMG_3075
Ciao!

I was invited to attend the Art Institute’s Get Creative Sushi Class free of charge.  All thoughts in this article are my own. You know me- If I don’t have anything nice to say, I don’t say anything at all.

Honey Garlic Jalapeño Chicken!

Fall-off-the-bone, juicy, flavorful chicken thighs are the absolute best! Since most of the time we don’t meal plan one day ahead, a long marination process can seem impossible. By using a robust marinade, you can easily create a depth of flavor without the 8 hour marination process. By robust, of course I mean garlic, a hint of jalapeño, and honey for sweetness. A quick coating is all it takes!

image

I suggest grilling the thighs. If you live in Pittsburgh it’s impossible because it rains everyday! You can brown them in a pan like I did. The great thing is the thighs get completely smothered in gooey deliciousness and finished off in the oven, so either works. The marinade actually reduces to a thick sticky coating in the pan, totally ideal for chicken thighs.

image

I utilized the left over pan goo to pan sear the corn on the cob…this was genius.

image

Robust garlic and honey flavors with a hint of jalapeño is perfection on corn!!!

image

All I added was a coating of butter, a shake of paprika, and some finely chopped parsley for a fancy finish.

image

Garlic Honey Jalapeño Chicken
(makes 6-8 chicken thighs)

Ingredients:
1/3 cup honey
6 cloves of garlic, finely chopped
1 large jalapeño pepper, finely chopped
3 tbsp. olive oil- 2 tbsp. marinade/ 1 tbsp. for pan
2 tbsp. balsamic vinegar
Handful of chopped parsley or cilantro
salt/pepper
6-8 chicken thighs, skin on or off and rinsed

image

Directions:
Mix all ingredient together in a mixing bowl.

image

Coat chicken thighs in a ziploc bag or 9X13 pan to marinate.

image

Heat oven 350 degrees.
(Overnight or all day is best …if you have time! This marinade is strong so it is not absolutely necessary.)

Heat 1 tbsp. olive oil in a large pan.

Remove thighs from marinade and add to the pan. Keep excess marinade!

image

Brown thighs on each side 3-4 minutes per side.

Remove thighs from pan and add to a 9X13 baking dish.

image

Pour excess marinade over thighs.

Cover with foil and bake 35-45 minutes, make sure juices run clear. Chicken will be “fall off the bone” yum!

Especially if skin-on, crisp the thighs under the broiler for 5-7 minutes until desired crispness.

Let stand 5-10 minutes and serve!

image

image

I serve these delicious thighs with Pan Seared Corn on the Cob!(See directions above in intro.)
These two dishes are delicious! Both stars of the meal!

Enjoy!
Ciao!

Bun-less Meatball Sliders With A Parmesan Crisp!

Perfect as an appetizer or dinner, these bun-less meatball sliders bring together the flavors of meatballs in sauce topped with fresh grated parmesan cheese without the tradition. Ripe tomatoes, fresh basil, and a parmesan crisp create a clean and colorful stack of deliciousness.

Seriously, who needs the bun? And, seriously, who can live in this world without parmesan crisps? Parmesan crisps take 5 minutes to make and, like a great pair of earrings, they dress up everything!

image

image

Bun-less Meatball Sliders
Makes 6-8- 3 inch sliders

Ingredients:

1 lb. lean ground beef
1 egg
2 tbsp. basil, chopped
1/4 cup parmesan cheese
4 cloves garlic,finely chopped
1/4 cup breadcrumbs

Directions:

Add all ingredients and mix well by hand.

Form into 3 inch balls and flatten slightly so that the top plateaus.

Place on a foil covered pan 2 inches apart.

Bake 350 degrees for 8-12 minutes until desired doneness, flipping half way.

Toppings:
Whole Basil Leaves
Ripe Tomatoes, sliced

Parmesan Crisps-
Spoon 1-2 tbsp. parmesan cheese in piles approx. 2 inches apart on a parchment paper lined pan.

image

image

Bake 4-5 mins. until golden- just starting to brown.

image

Let cool.

image

Peel crisp from paper.

Build bun-less meatball sliders by topping the meat patty with one slice of tomato, a few basil leaves, and a parmesan crisp on top!

image

Serve and Enjoy!!

Ciao!